Vortex BW - Build Log/Diary

Hi everyone, apologies that it’s a fairly regular vert design but hopefully someone learns from the inevitable, expensive mistakes along the way!

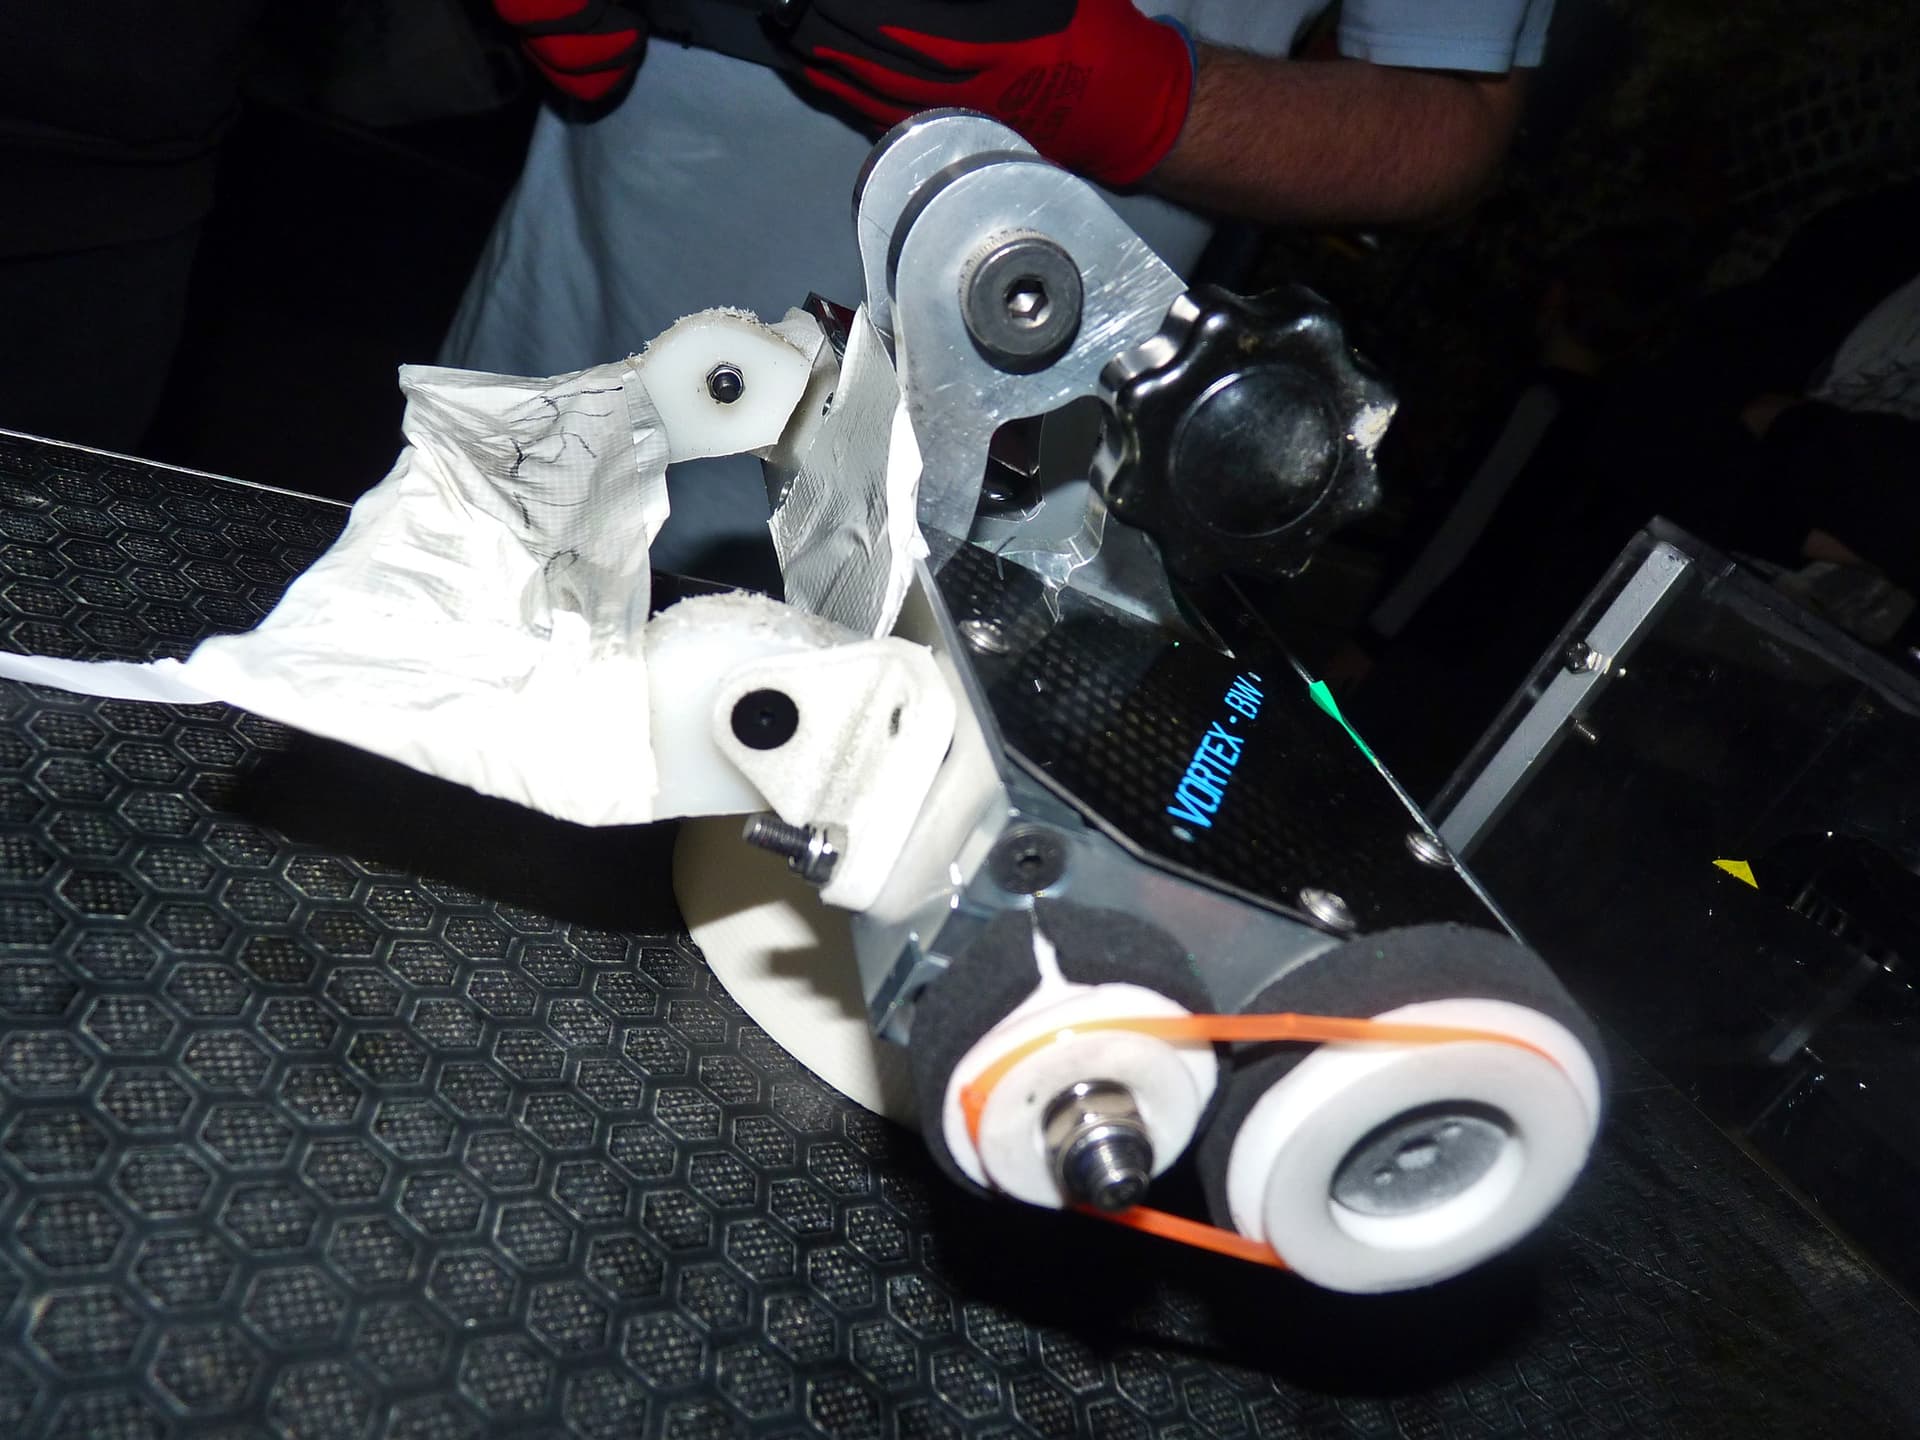
Vortex BW started as an idea to try and build a scaled down version of the formerly-working heavy George and I used to run: Vortex. Whilst it was a complete sack of bolts, it did at least have quite a cool look to it and it would have been pretty unique in the beetle scene. The problem with this plan was that heavies don’t scale down very well, so after multiple cracks at it the plan was abandoned.

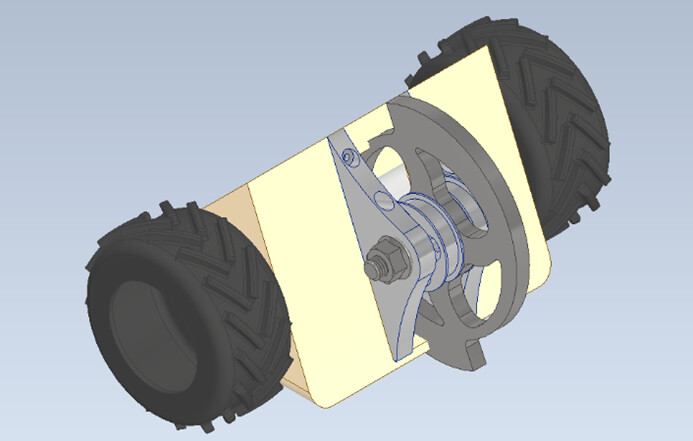
Figure 1: The first draft of Vortex BW. Awful

However, during the aforementioned design process there was one bit that was consistent throughout. The disc design. The size was pretty well set early on, and the look is a straight scaling down of the heavy’s disc. So in my infinite wisdom, I went ahead fairly early in the process and got that waterjet cut, along with getting 2 pulley/bosses for it CNC’d in China. I then later decided to can the mini-Vortex project and was now stuck with the disc and pulley combo…

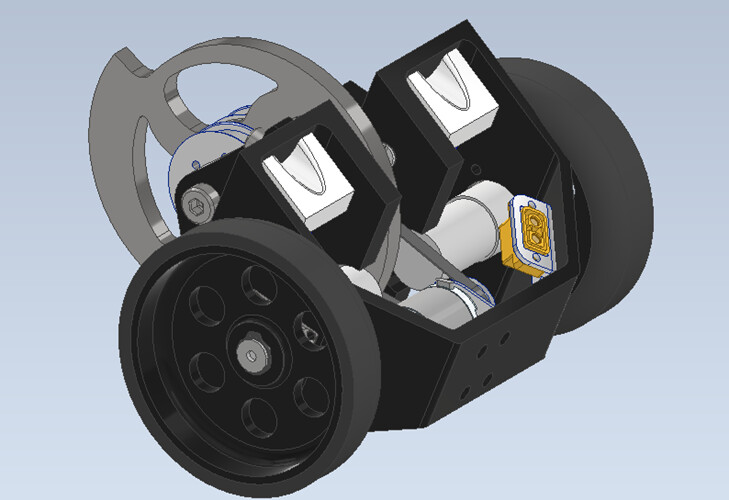
Figure 2: A later draft that’s better than before, but nowhere near being considered good.

image

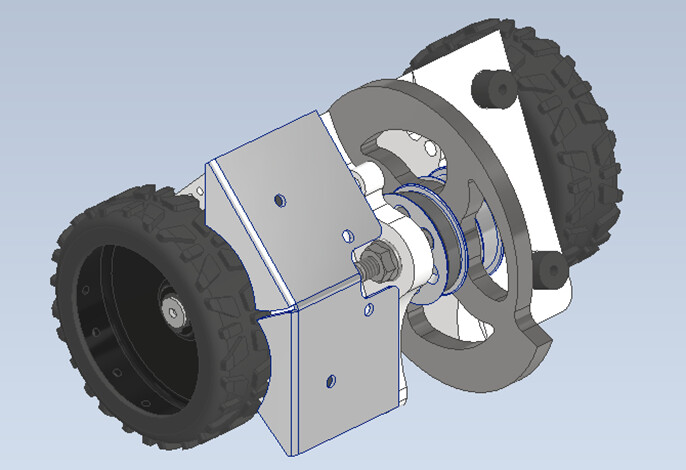
Figure 3: Around here it was all called off

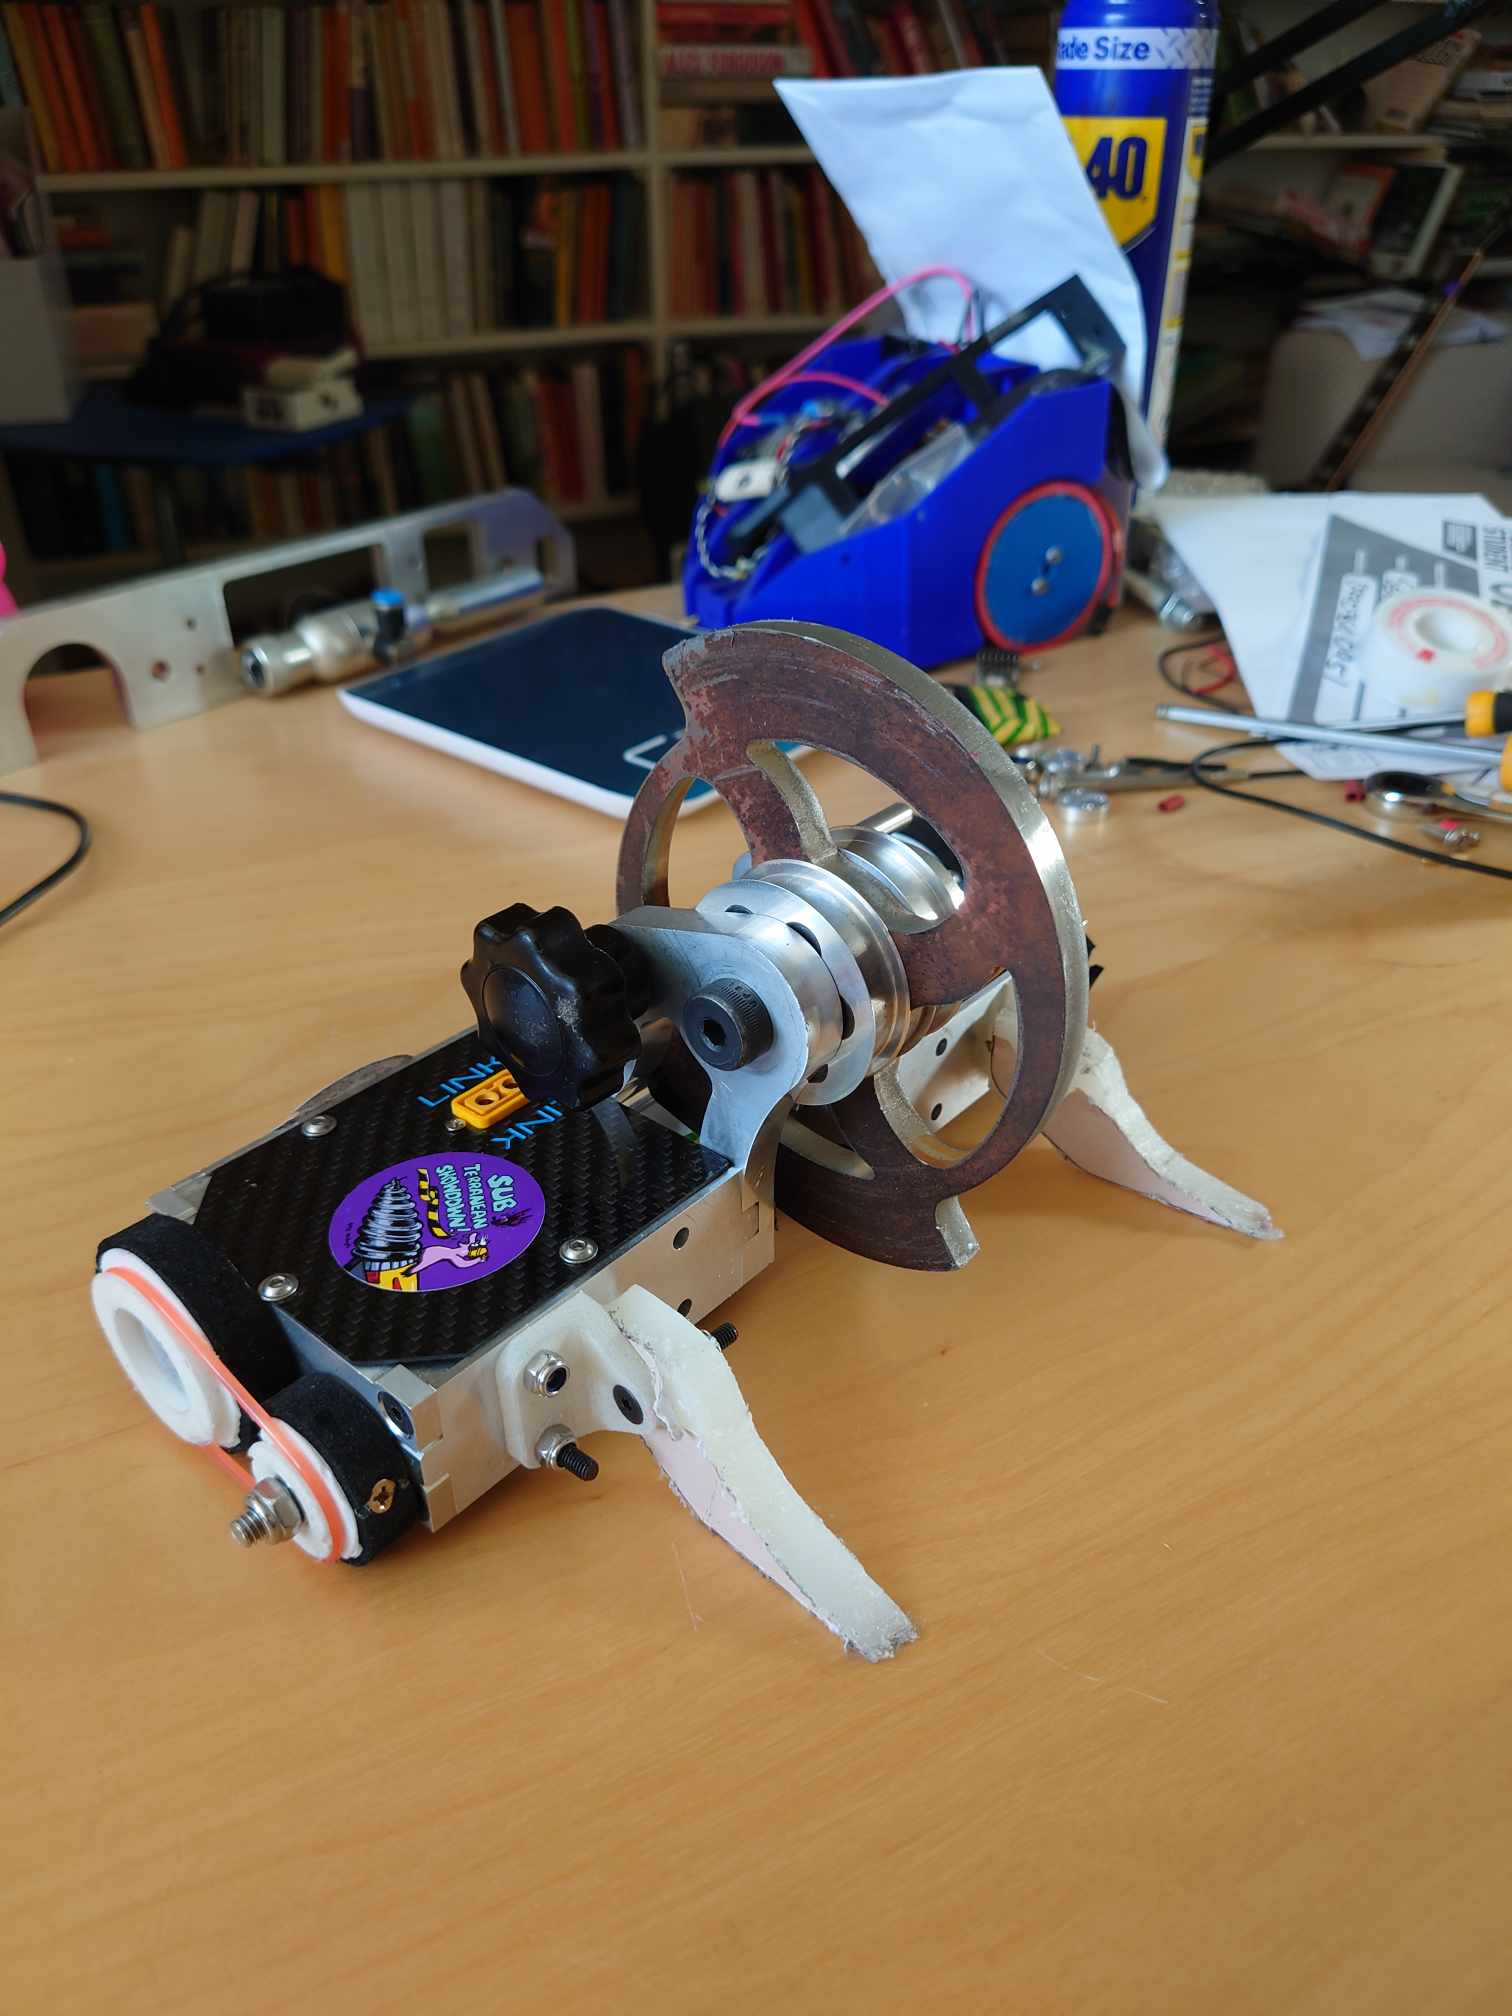
That was until January, when a heavy cold beset me and I decided that I was going to pass the ill time by designing something to make use of these parts I’d had made. I would strongly advise that all Lemsip packages should contain warnings to not design robots whilst under the influence, along with operating heavy machinery. The robot would maintain the name Vortex BW as a nod to where the whole idea kicked off; but was now simplified to a vehicle to move the disc around in a fairly simple package.

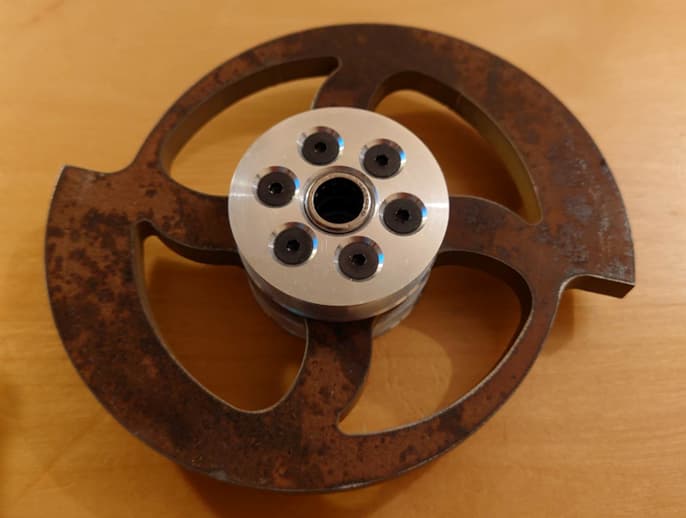
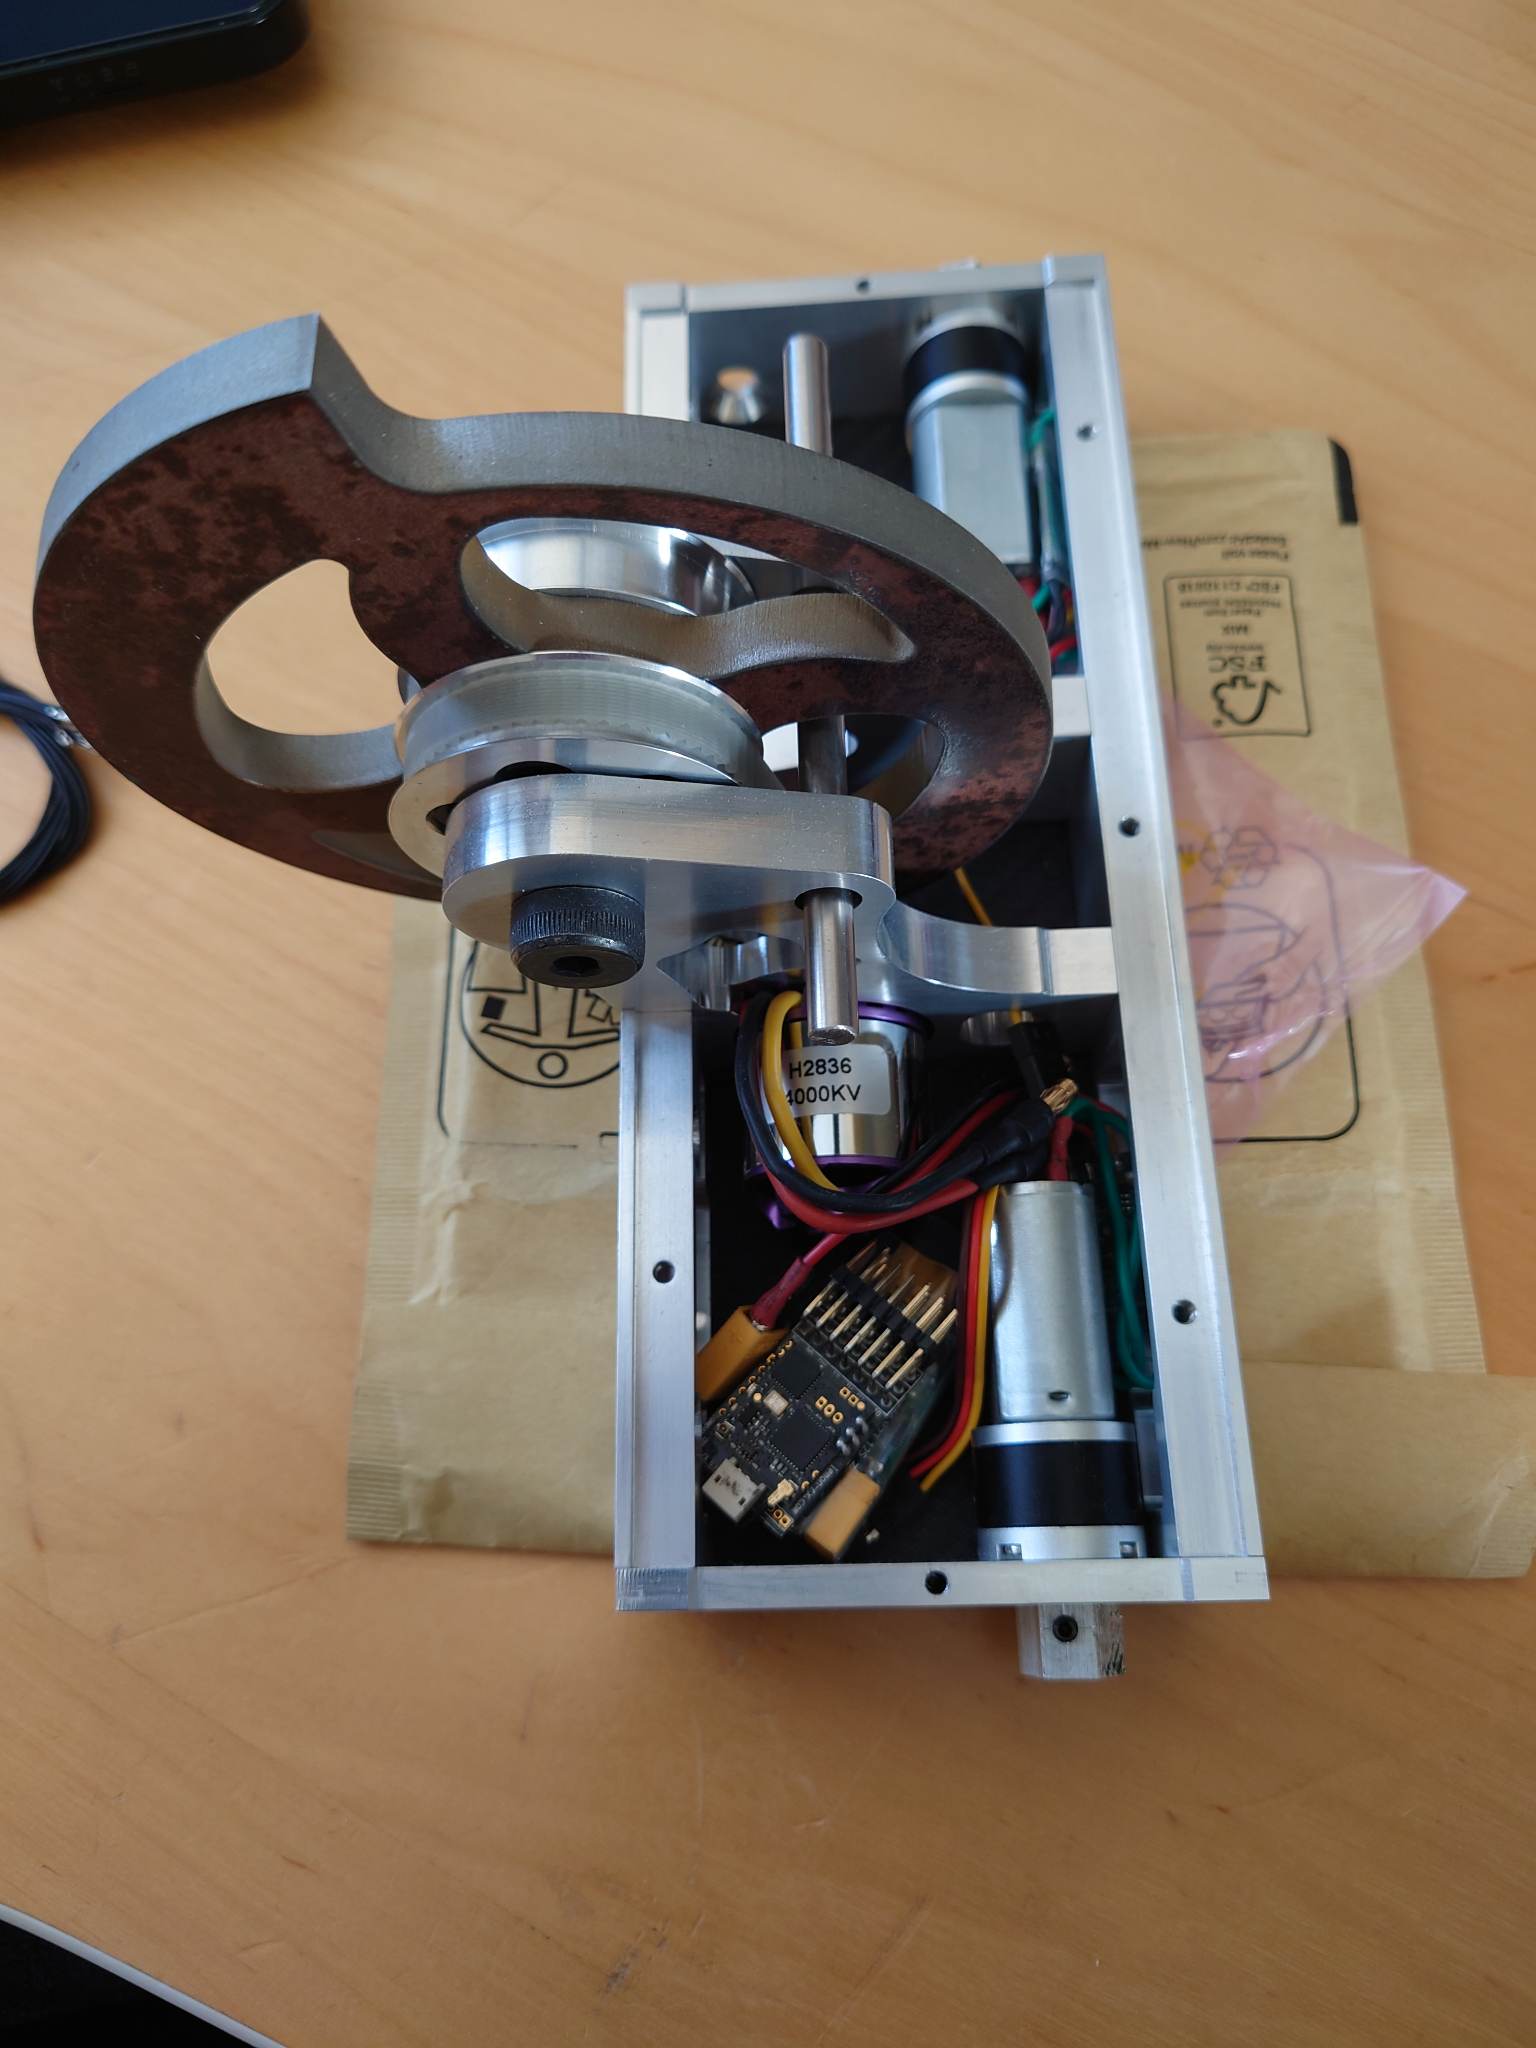
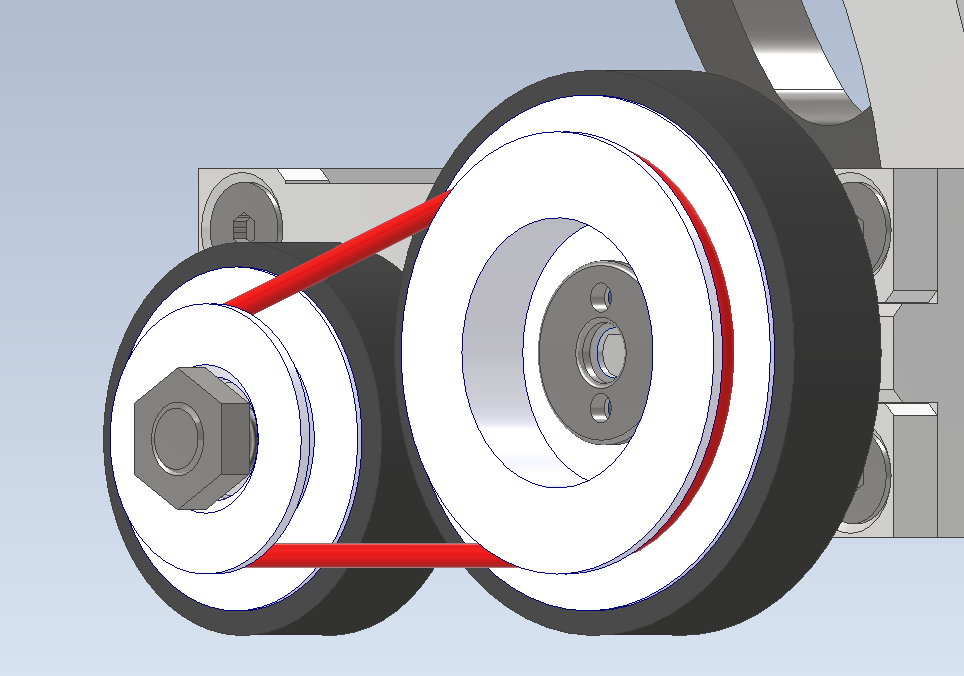
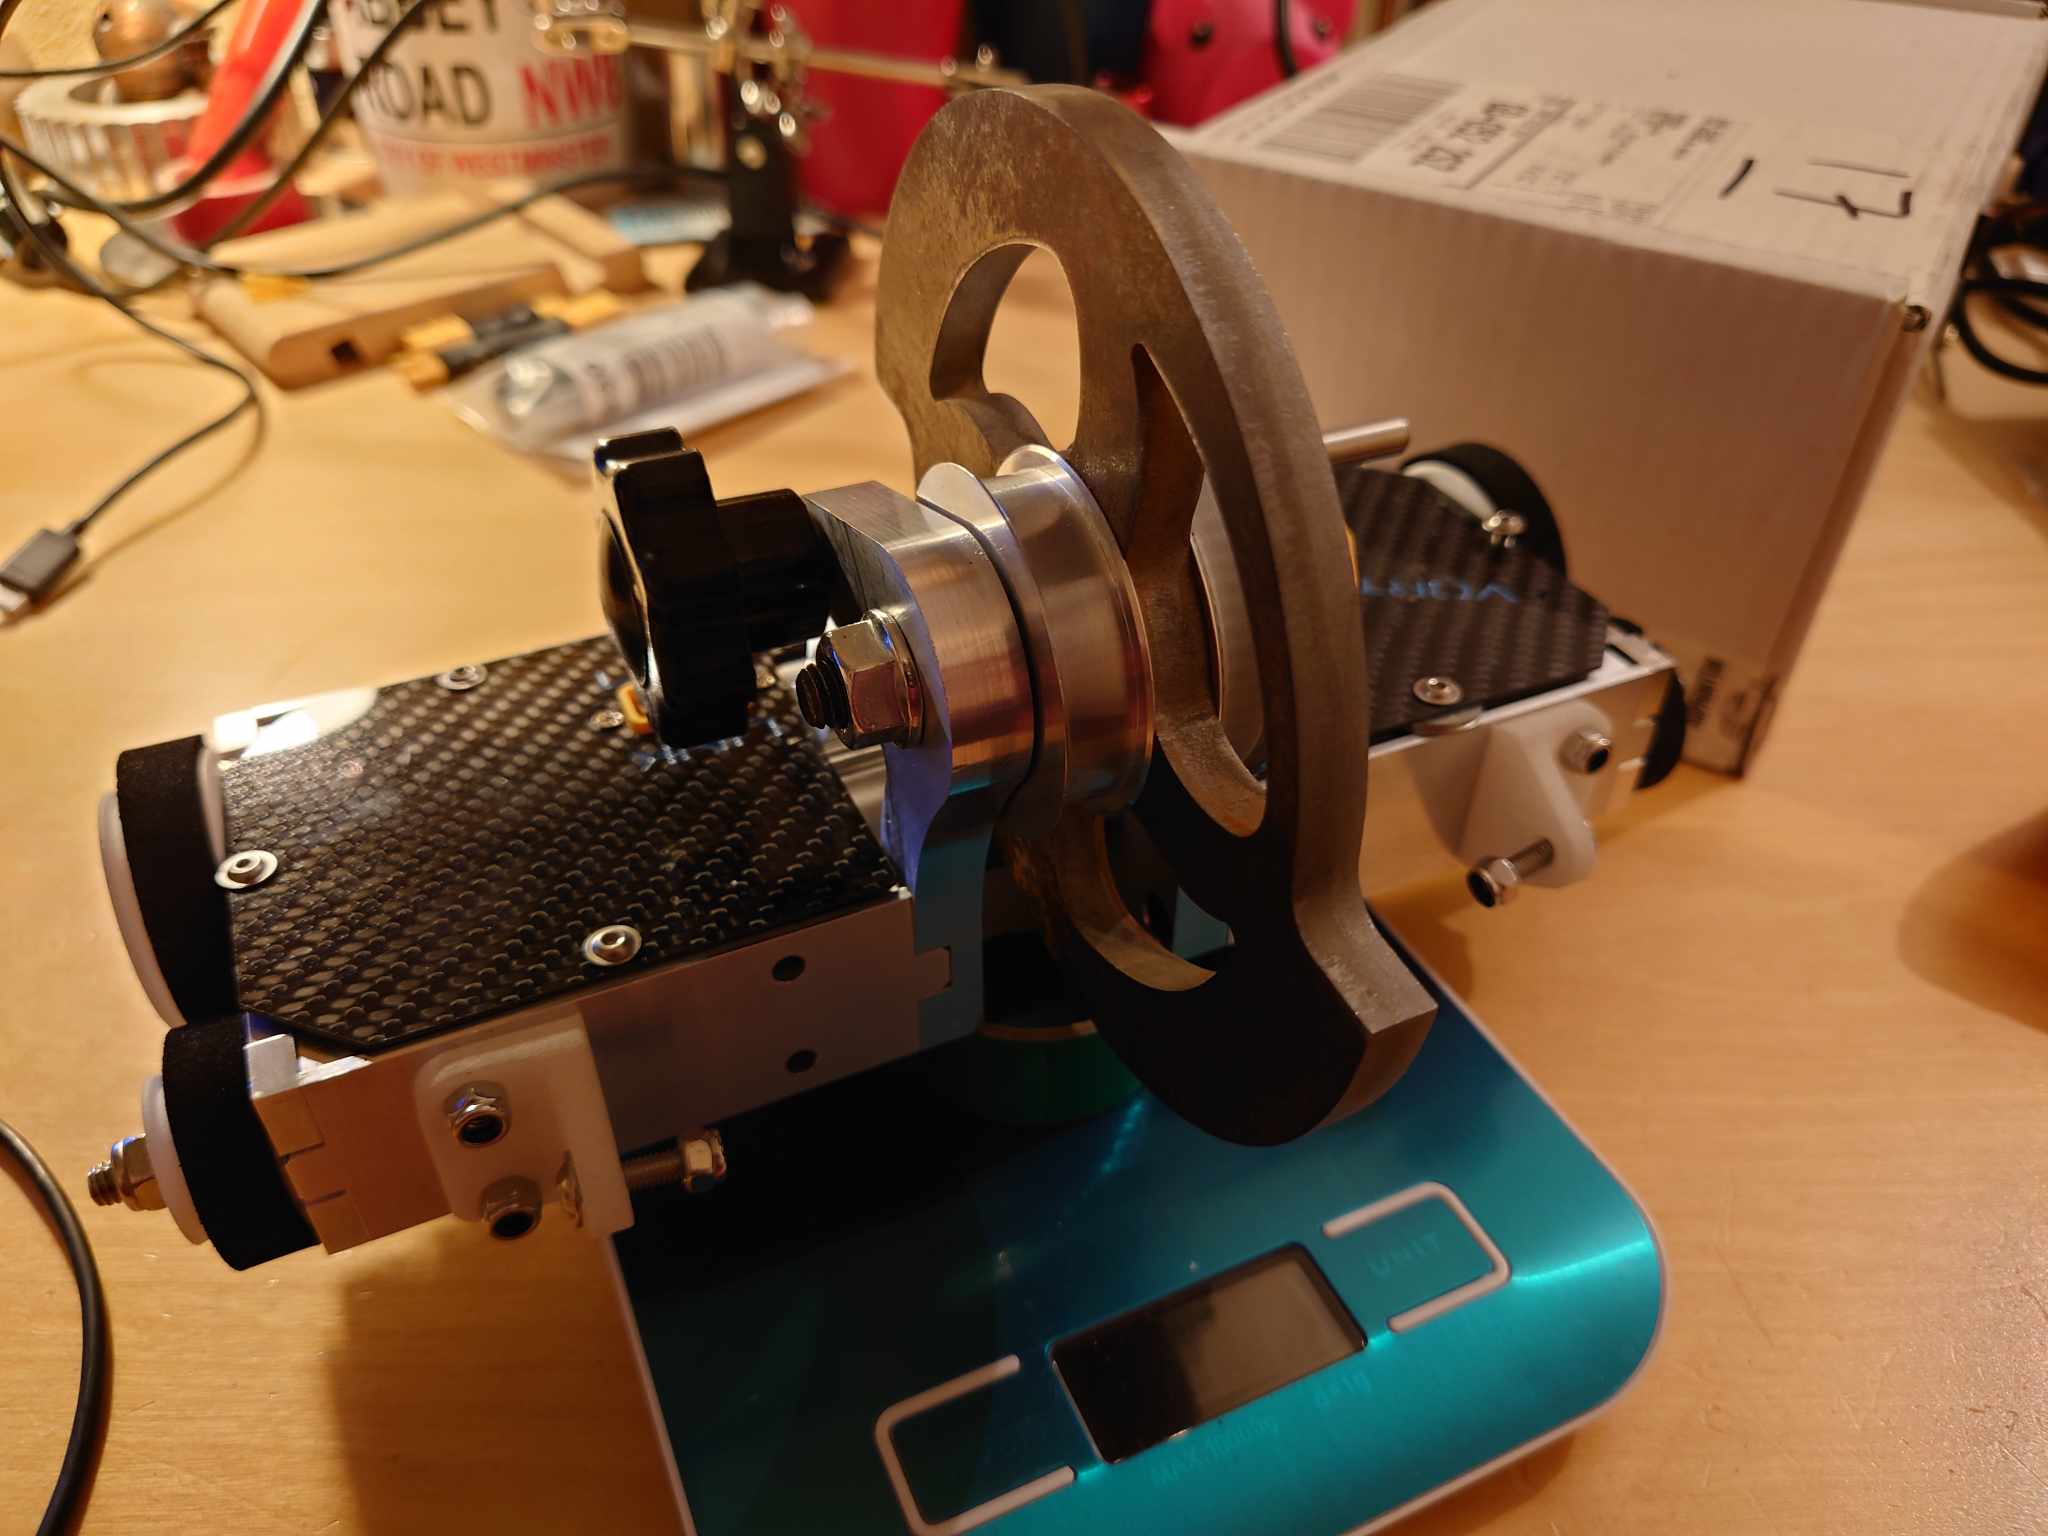
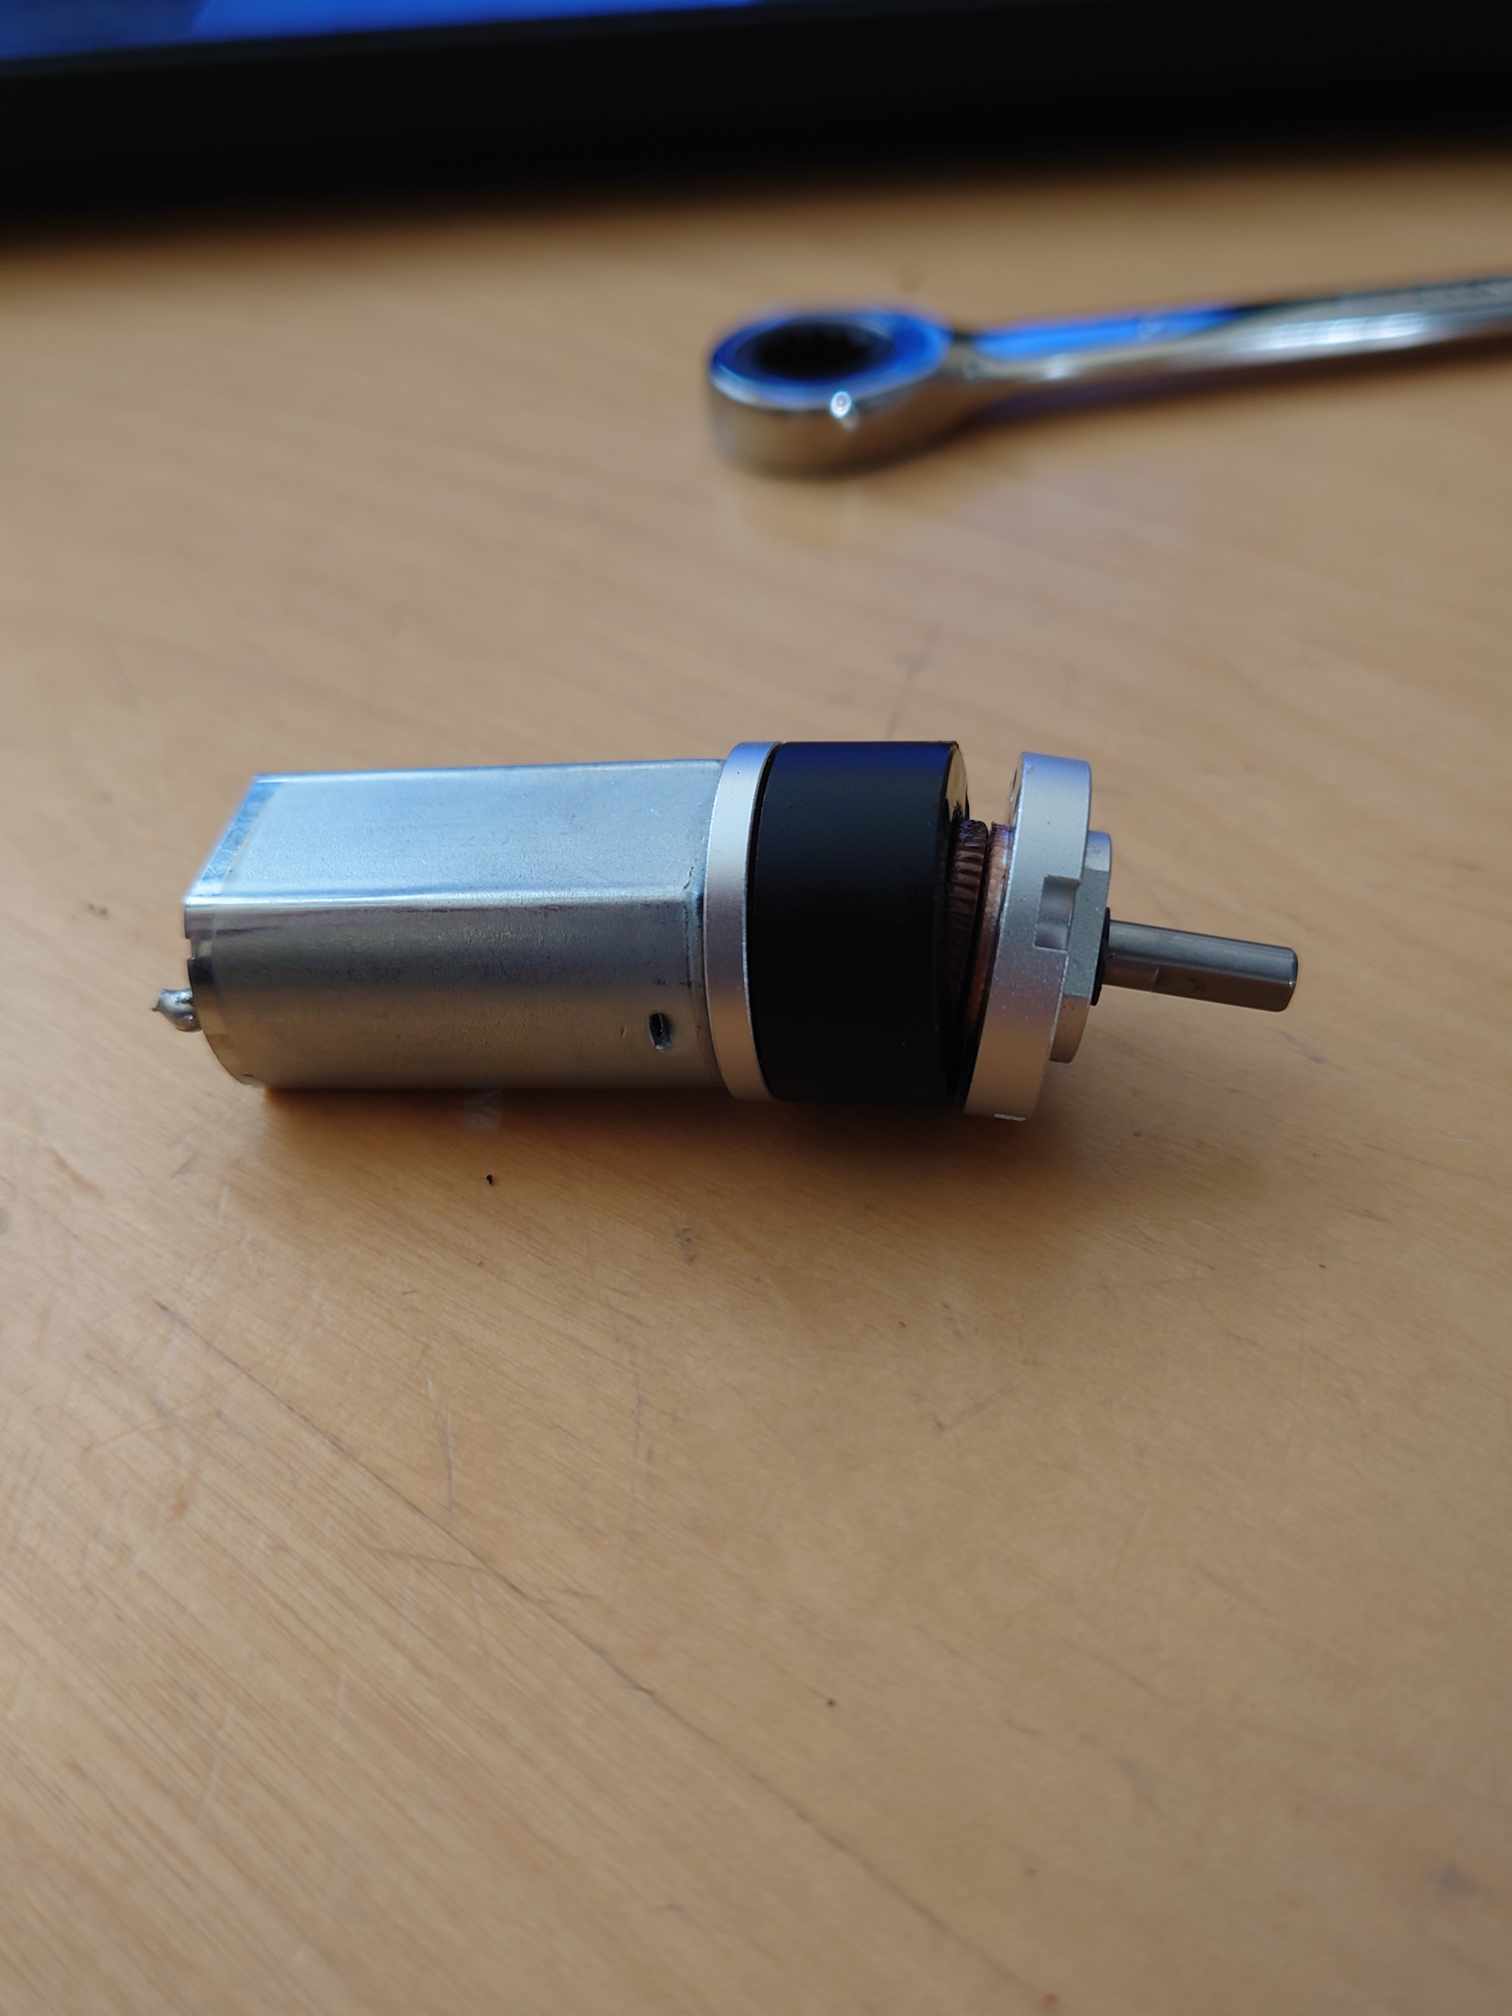
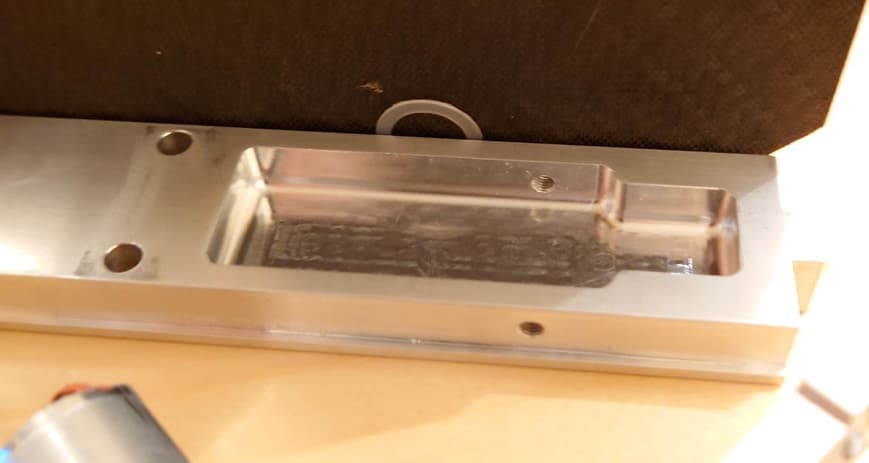
Figure 4: The disc assembly, I’ll need to clean and polish the disc before it makes an appearance out in public. This whole lot comes to exactly 500g

The disc I was saddled with is a doozy, it’s only 130mm in diameter but it’s 8mm thick Hardox 450 and weighs around 420g on its own. Add in the two pulleys and it’s exactly 500g, which I’d love to say was clean design but is good old dumb luck. It’s a 2 toothed design, which isn’t too common at beetle level but that’s a factor of being a homage to a heavy. That ended up giving the design some focus, the two toothed design would lend itself better to being a lower speed design that is focussed on follow through. That then paired itself to having a fairly high speed motor, but gearing that down to get some good torque behind the weapon.

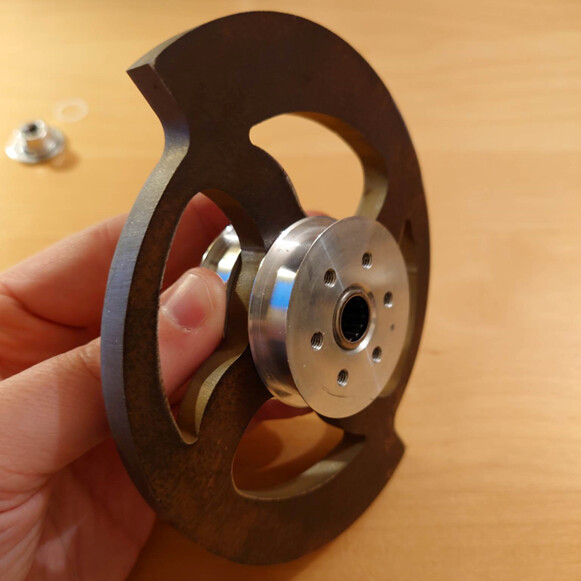
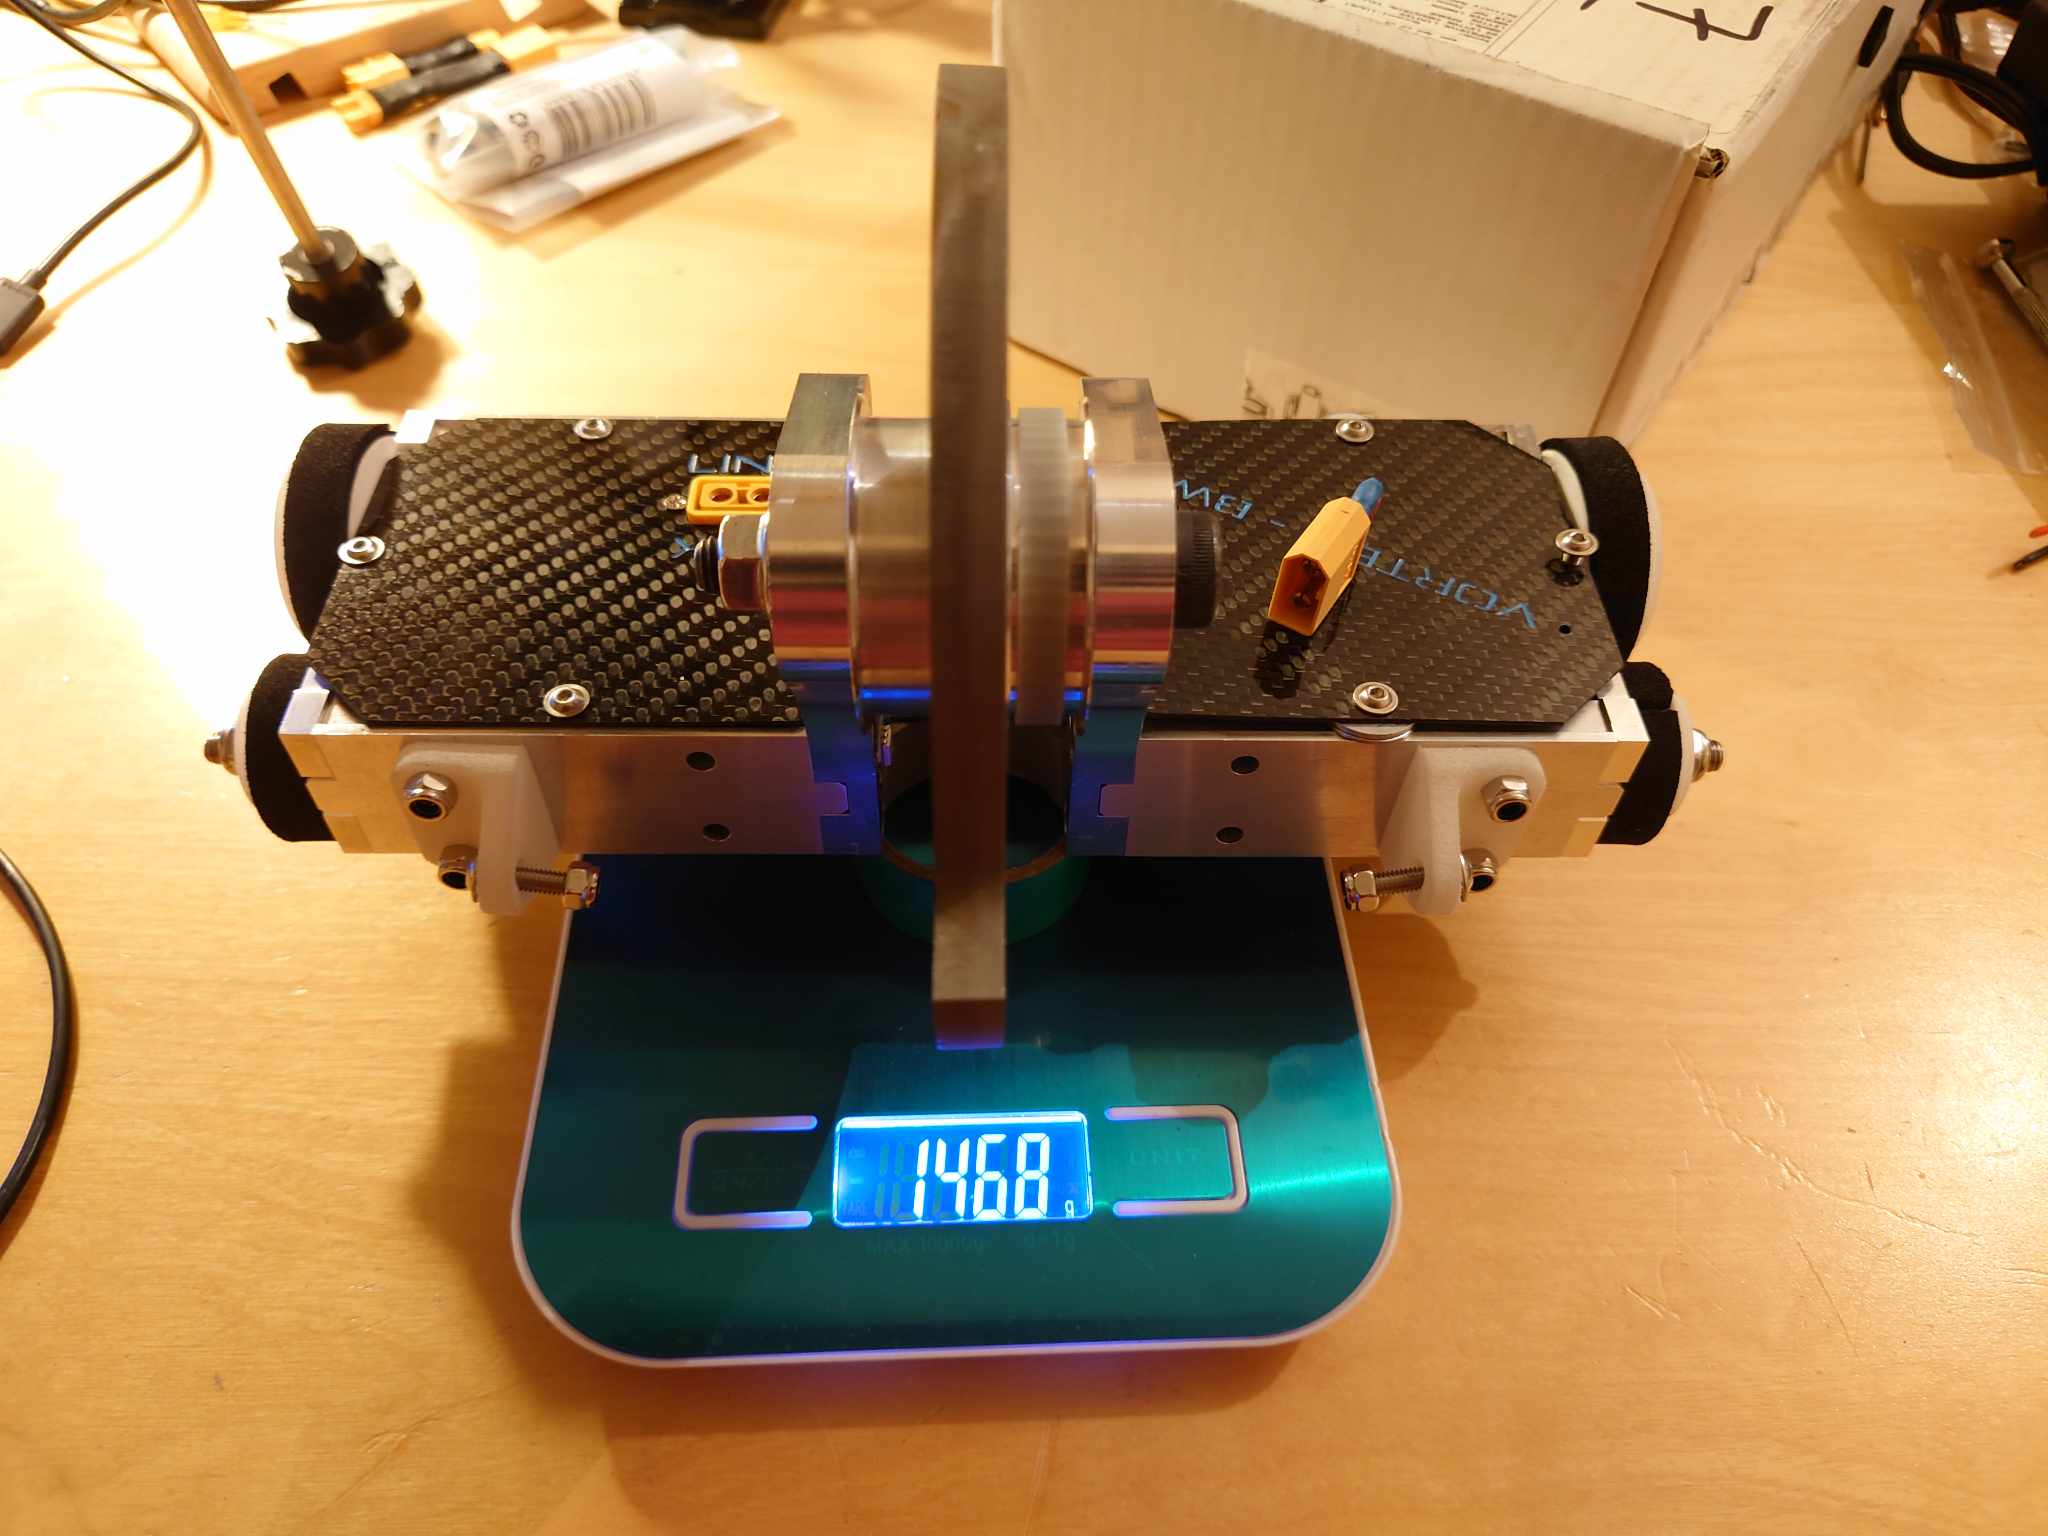
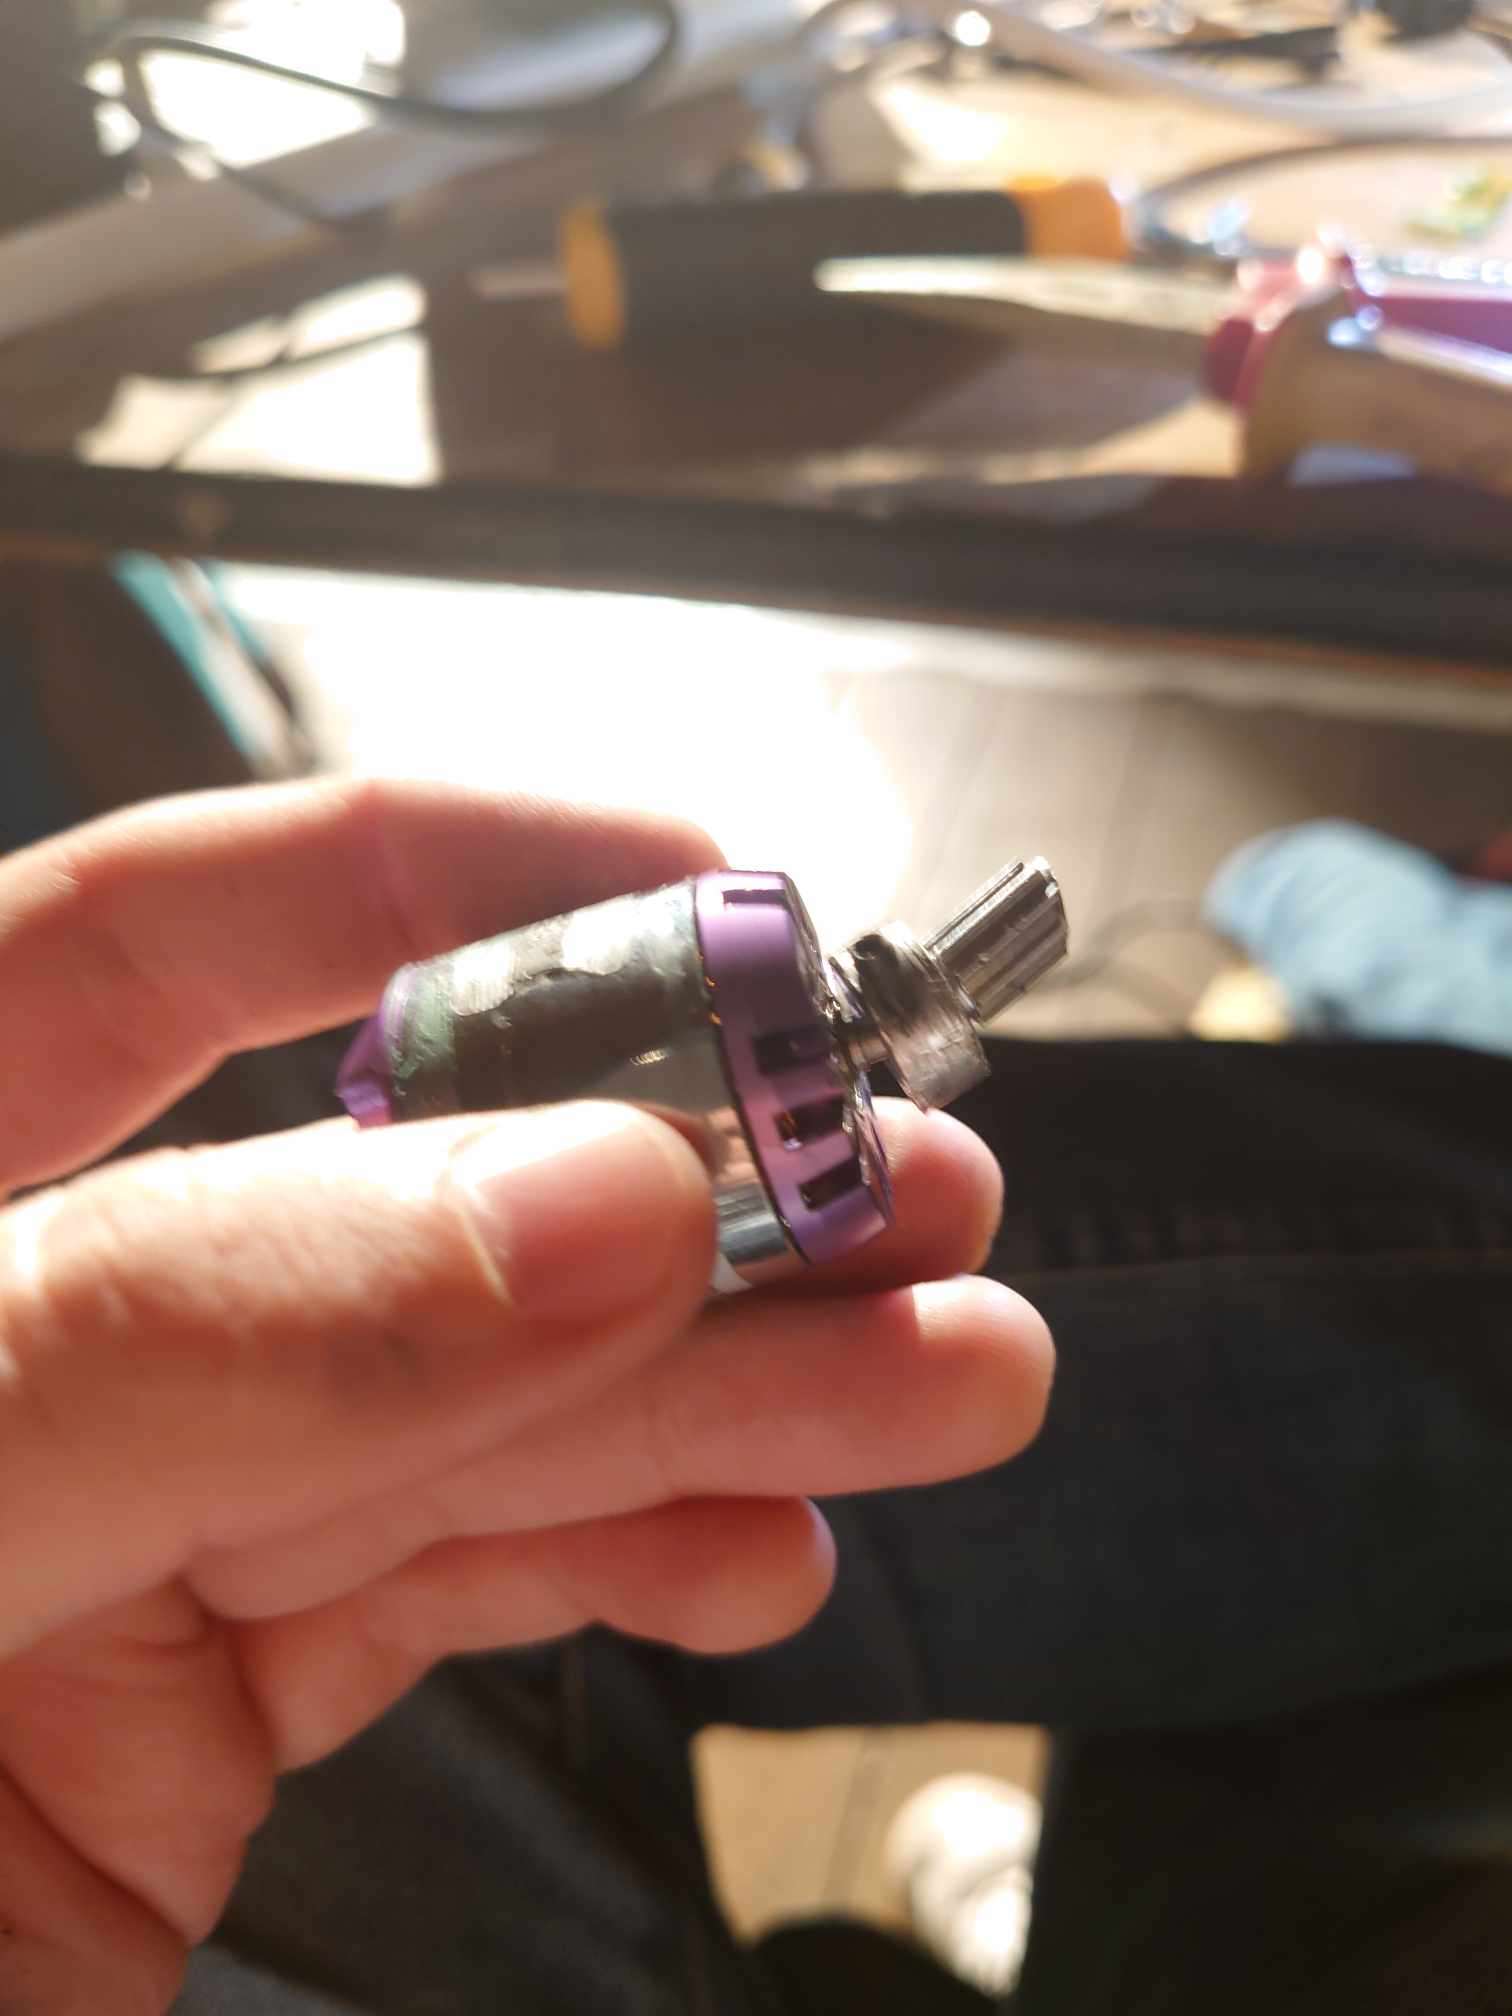
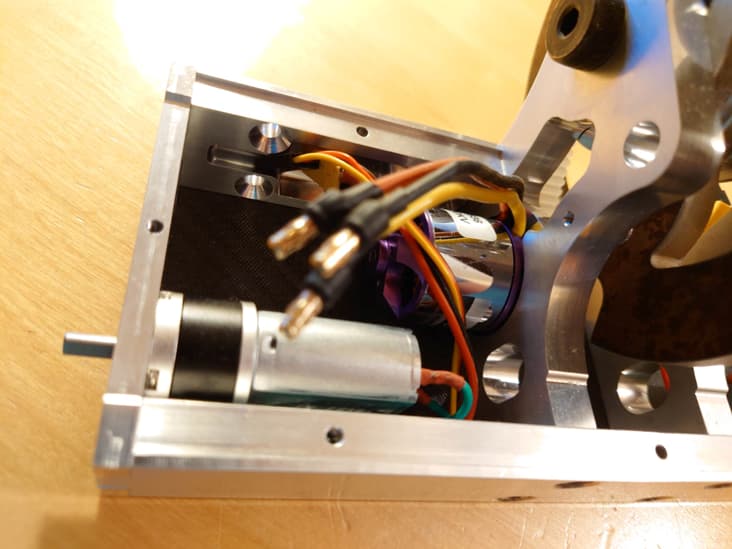
Figure 5: Another angle, the disc itself is 8mm thick. A pair of needle roller bearings are the rotating elements of this setup, we’ll see if they are sad in use or not

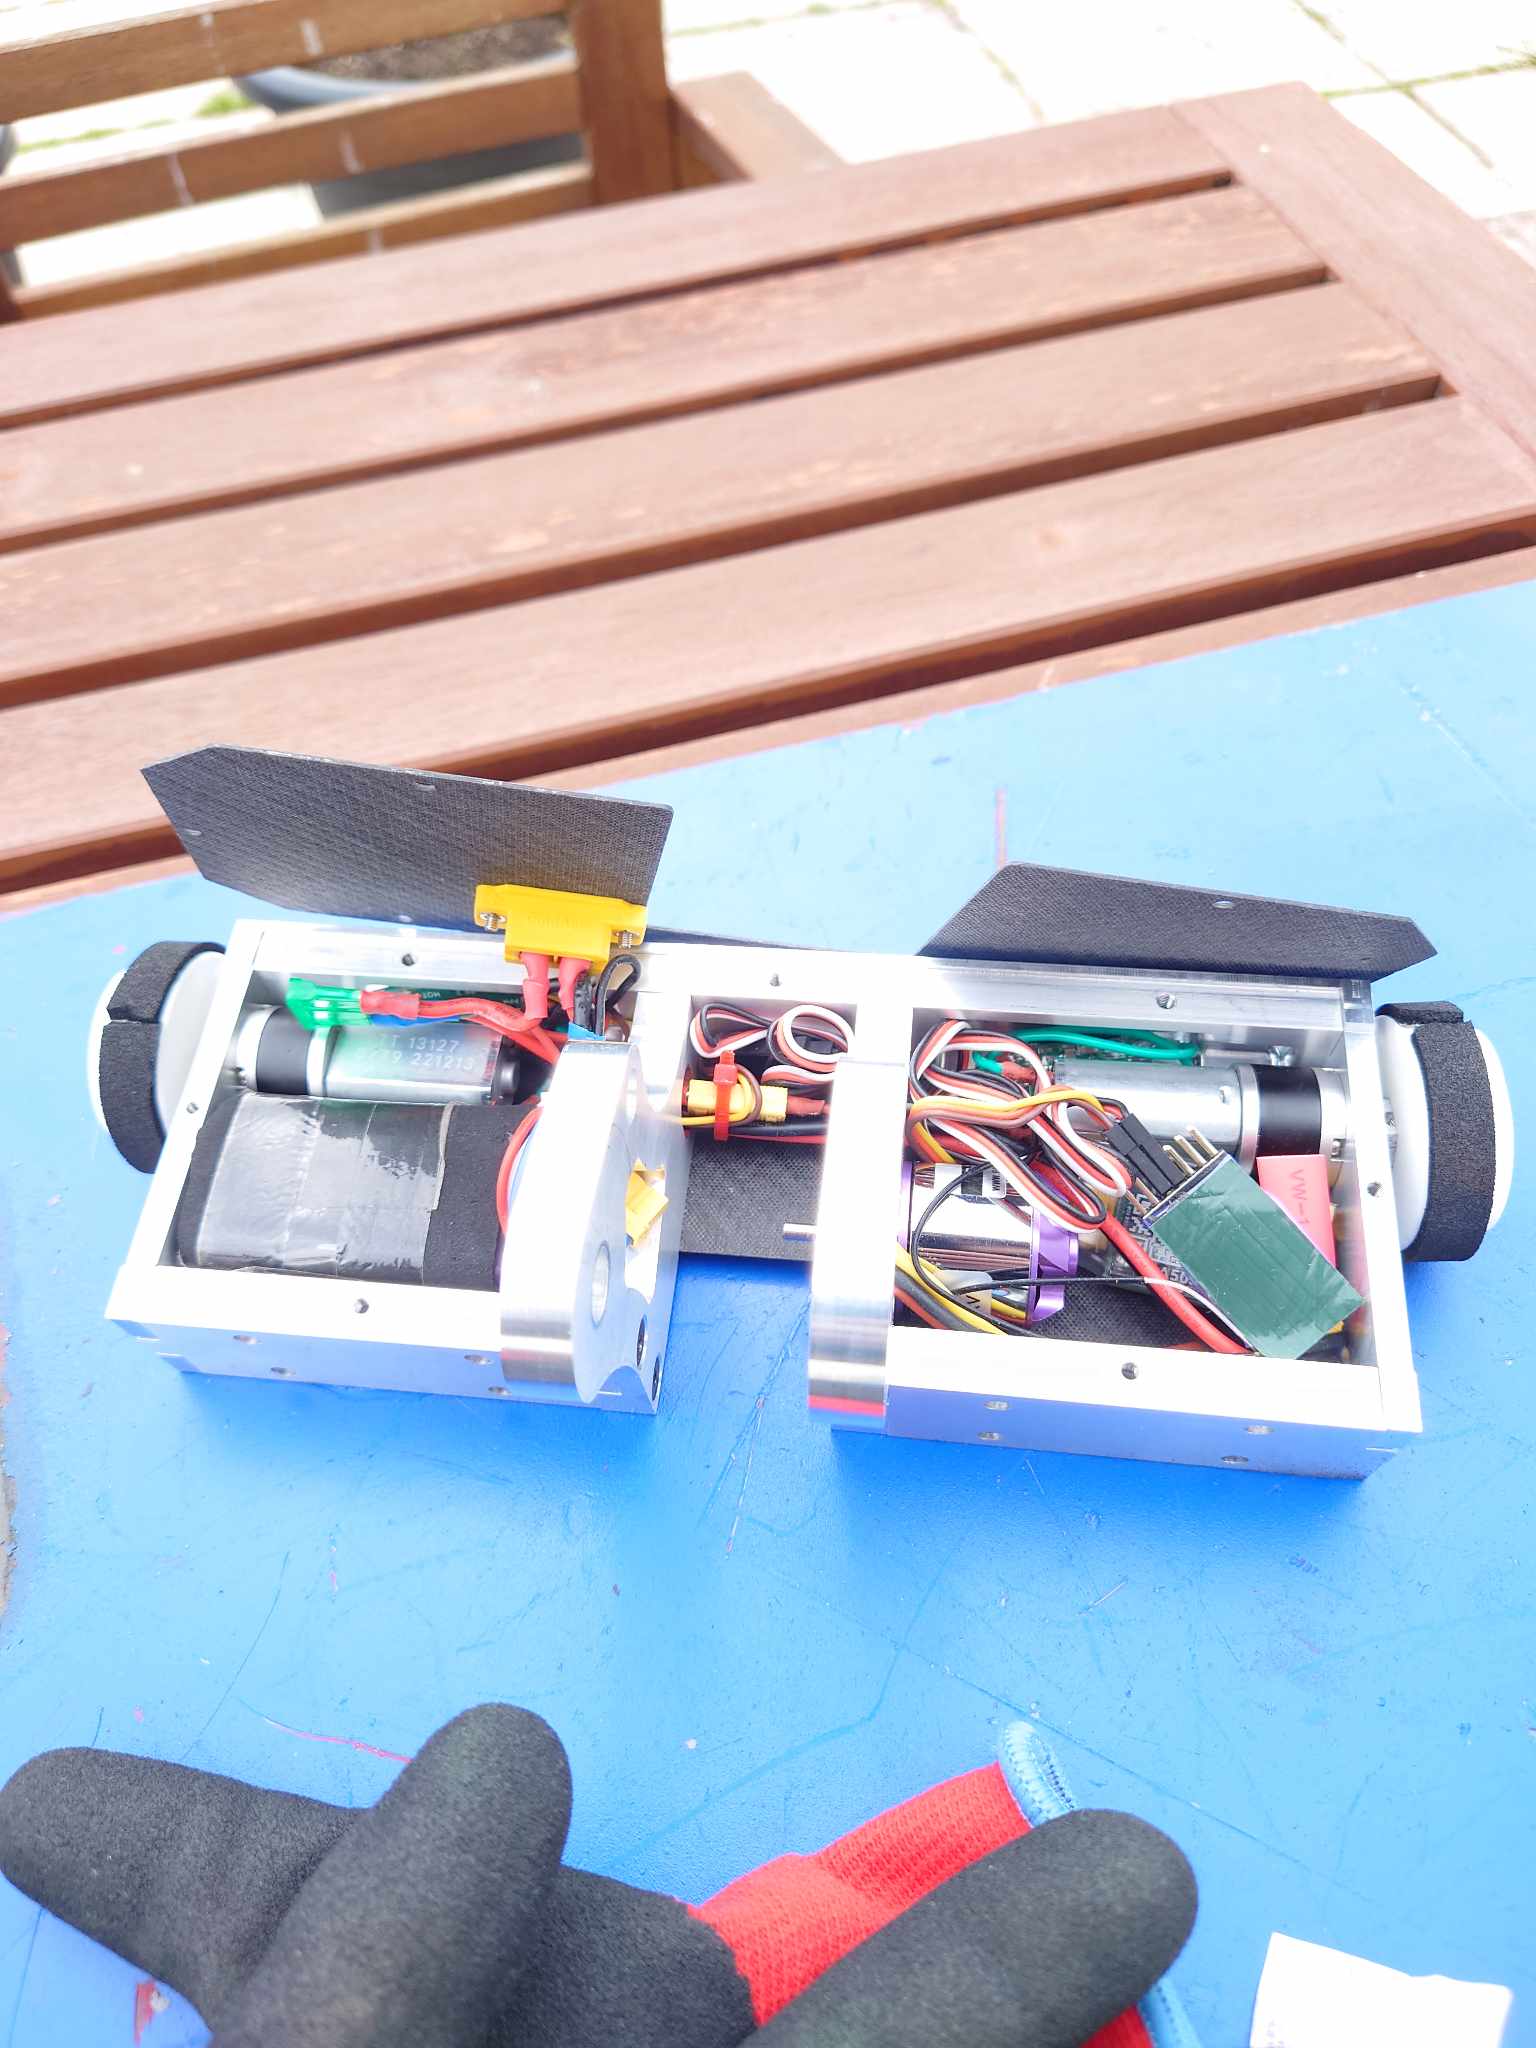
Because the disc was so heavy, the rest of the bot had to be fairly light. It was obvious that the bot was going to be firmly in the glass cannon category, but that’s no bad thing. From there, it was a question of how I wanted to build it. For a long time I’ve admired bots with CNC’d aluminium frames and had wanted to build something in this style. Needing a small, solid robot to cart the disc around, it seemed the right time to exploit the benefits of this design style. From there the rest of the design fell into place.

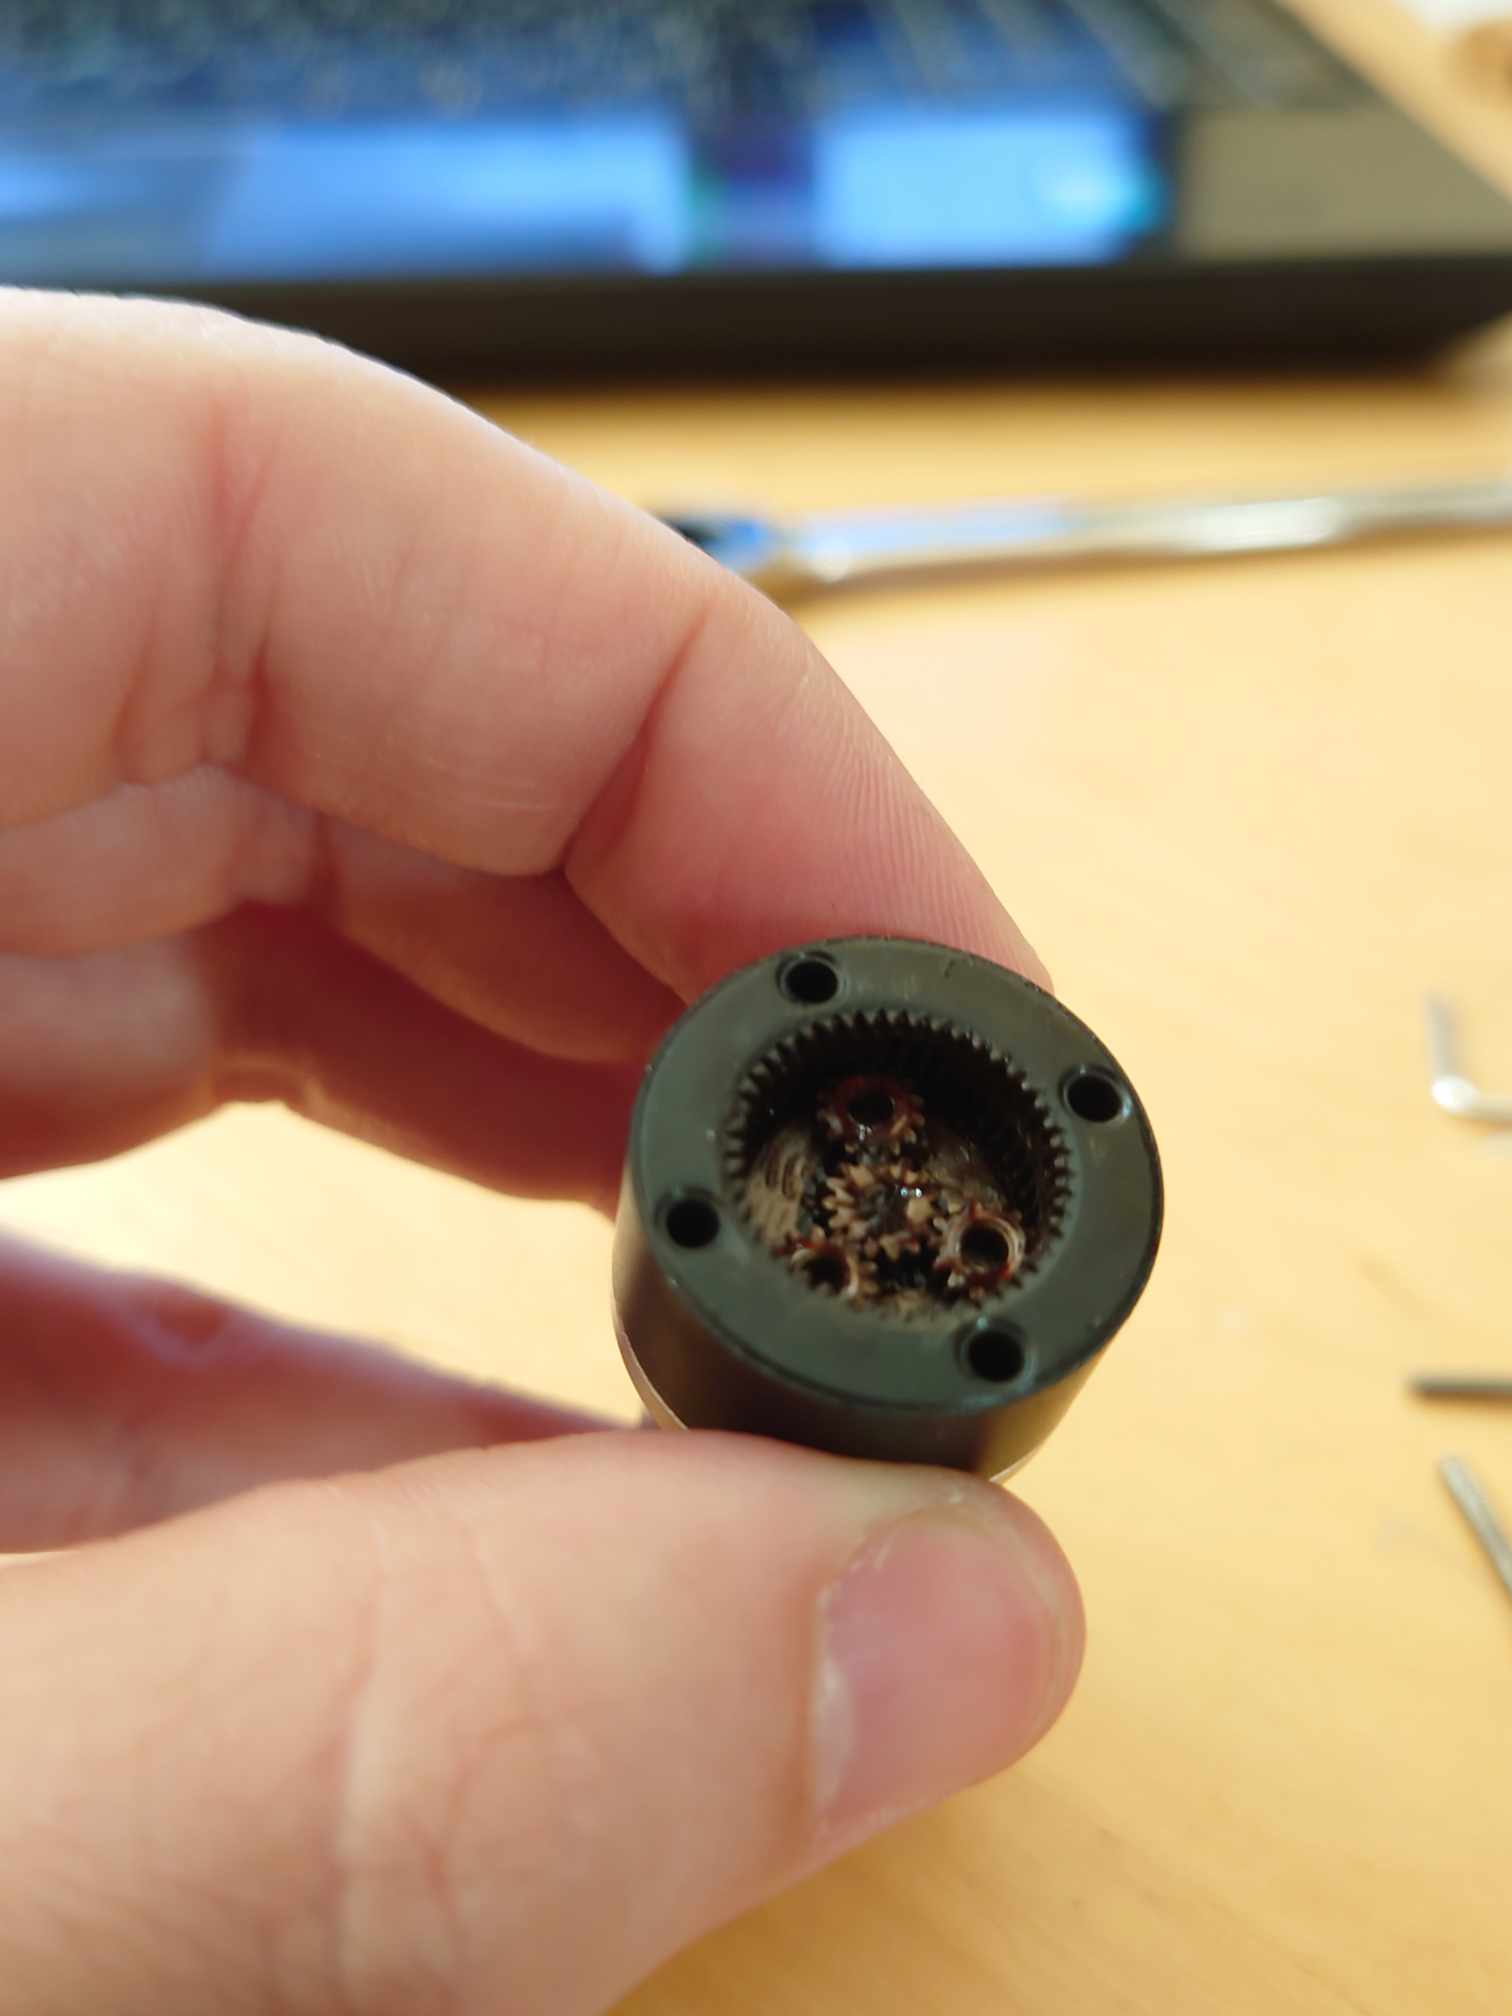
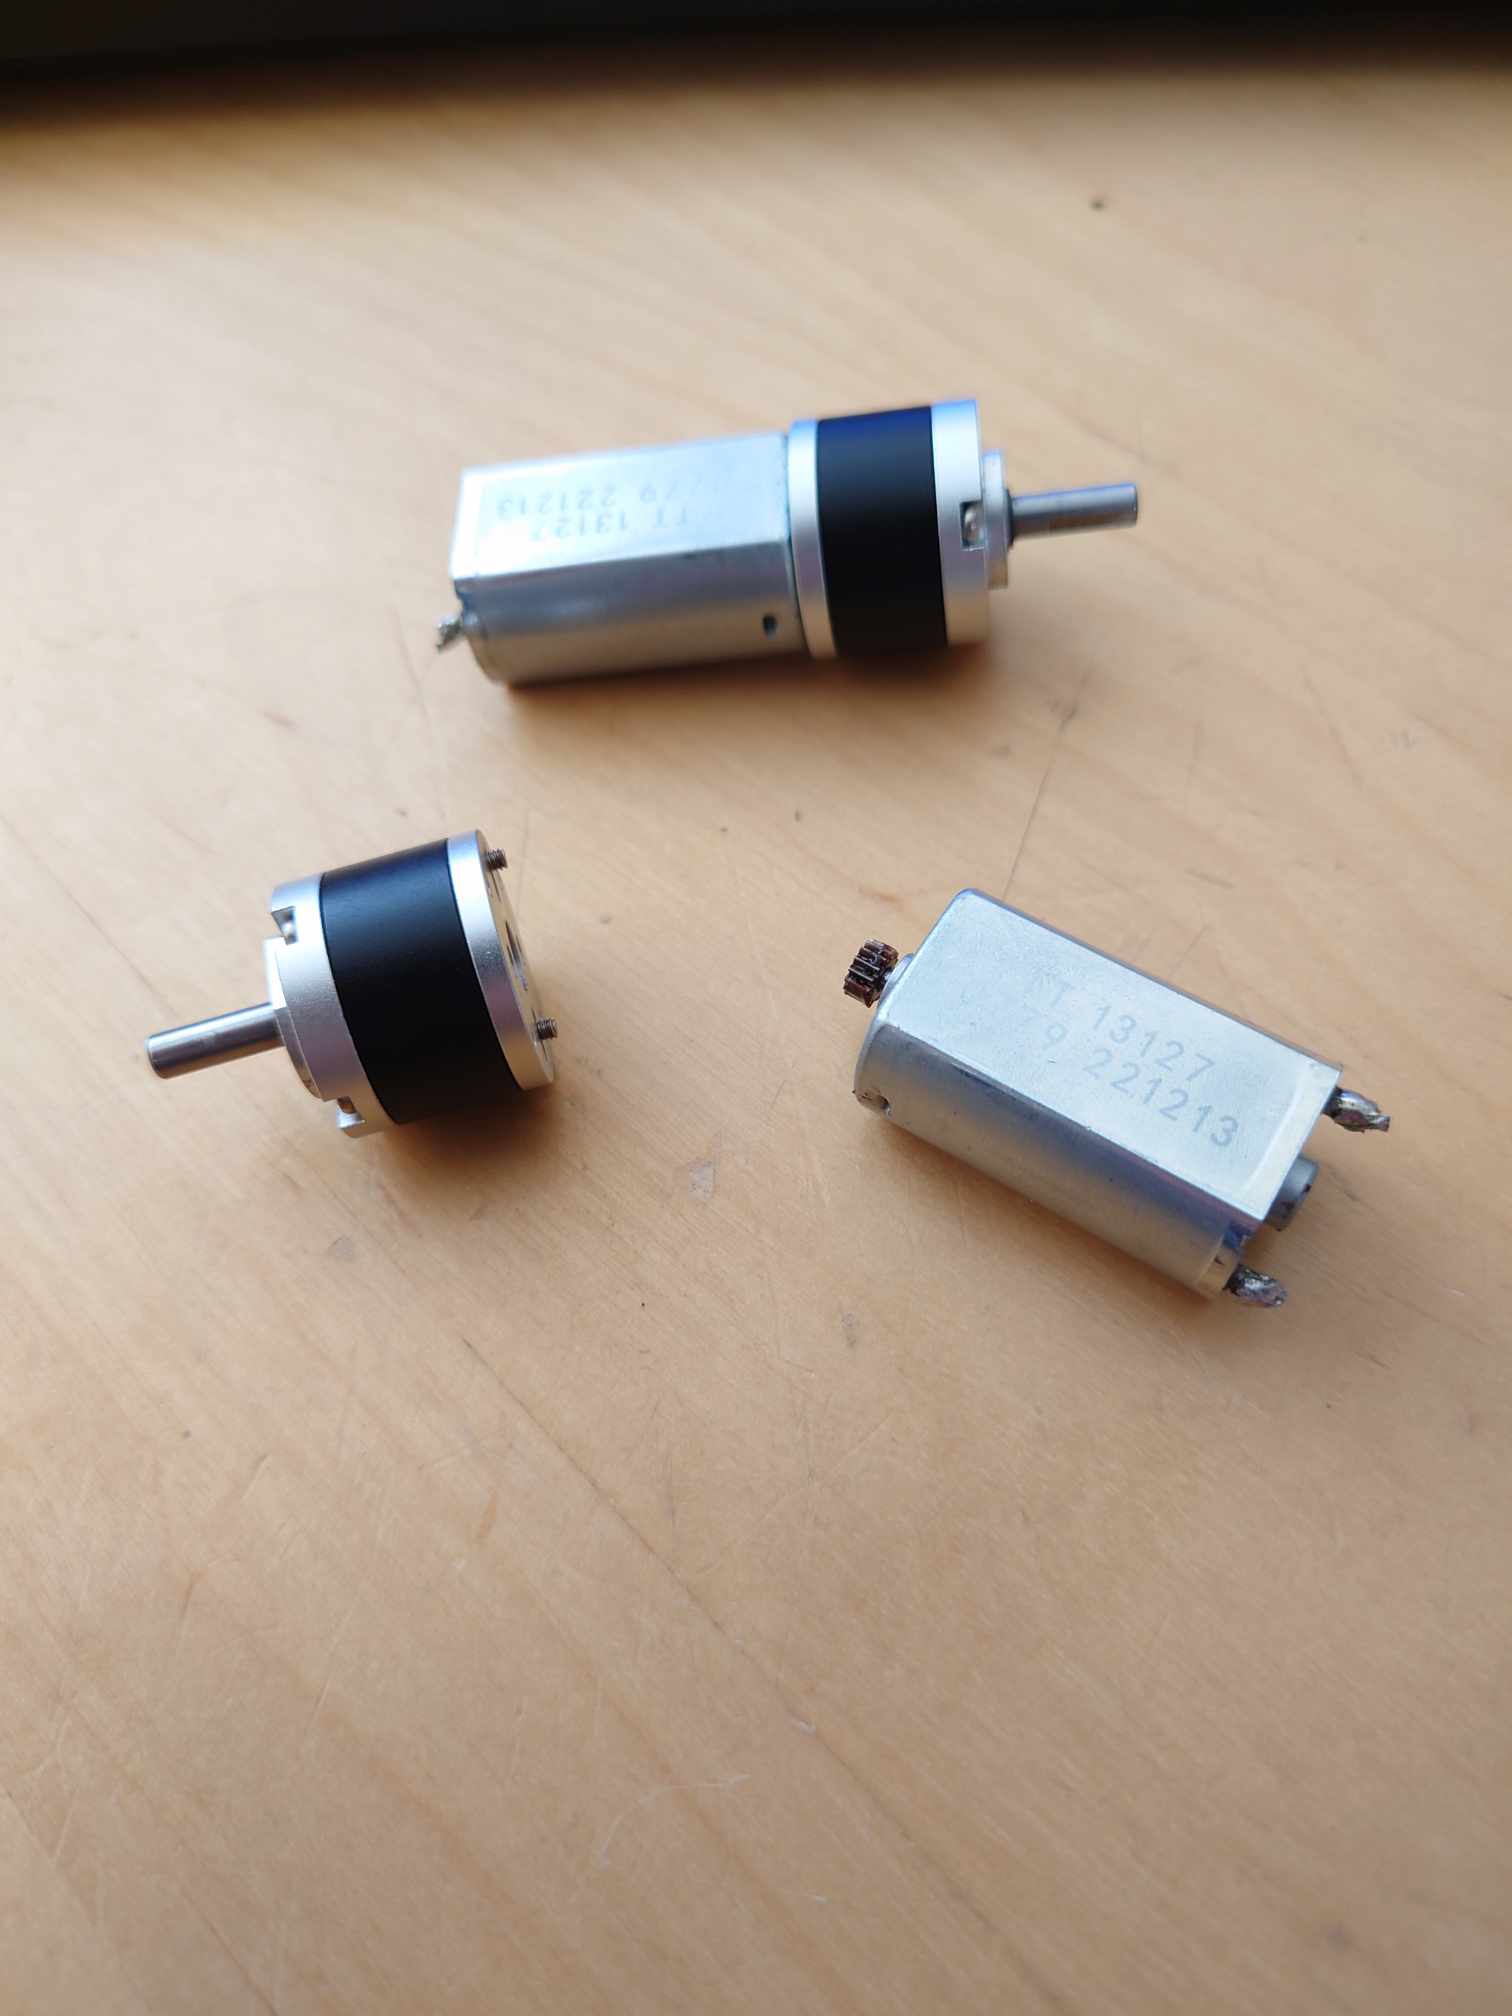
The CAD started by placing down the internal components, and gambling on how small the chassis could be wrapped around them. The robot is intended to run on 4S, using an Overlander LiPO and runs on a pair of 22mm motors from our forum overlords. The weapon originally was intended run on a Propdrive 2836 but that being perma-out-of-stock required looking elsewhere. eBay came to the rescue there, and a FlashHobby 2836 was purchased instead. We’ll see if that is reliable or detonates in fights.

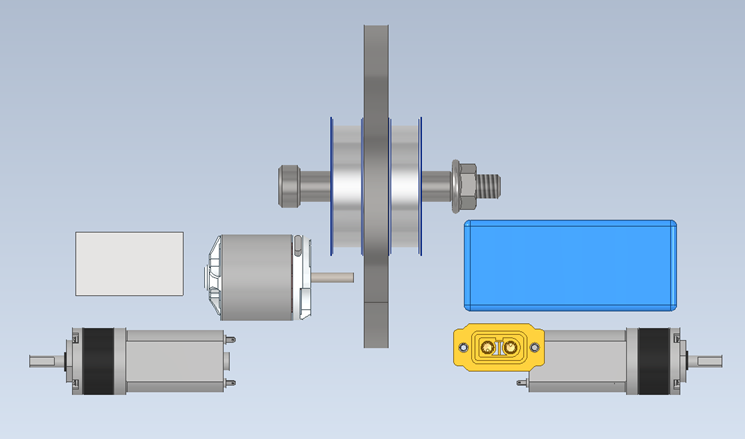
Figure 6: The start of internal tetris. It was shaping up to be a smol bot, with hopefully enough room for wiring…

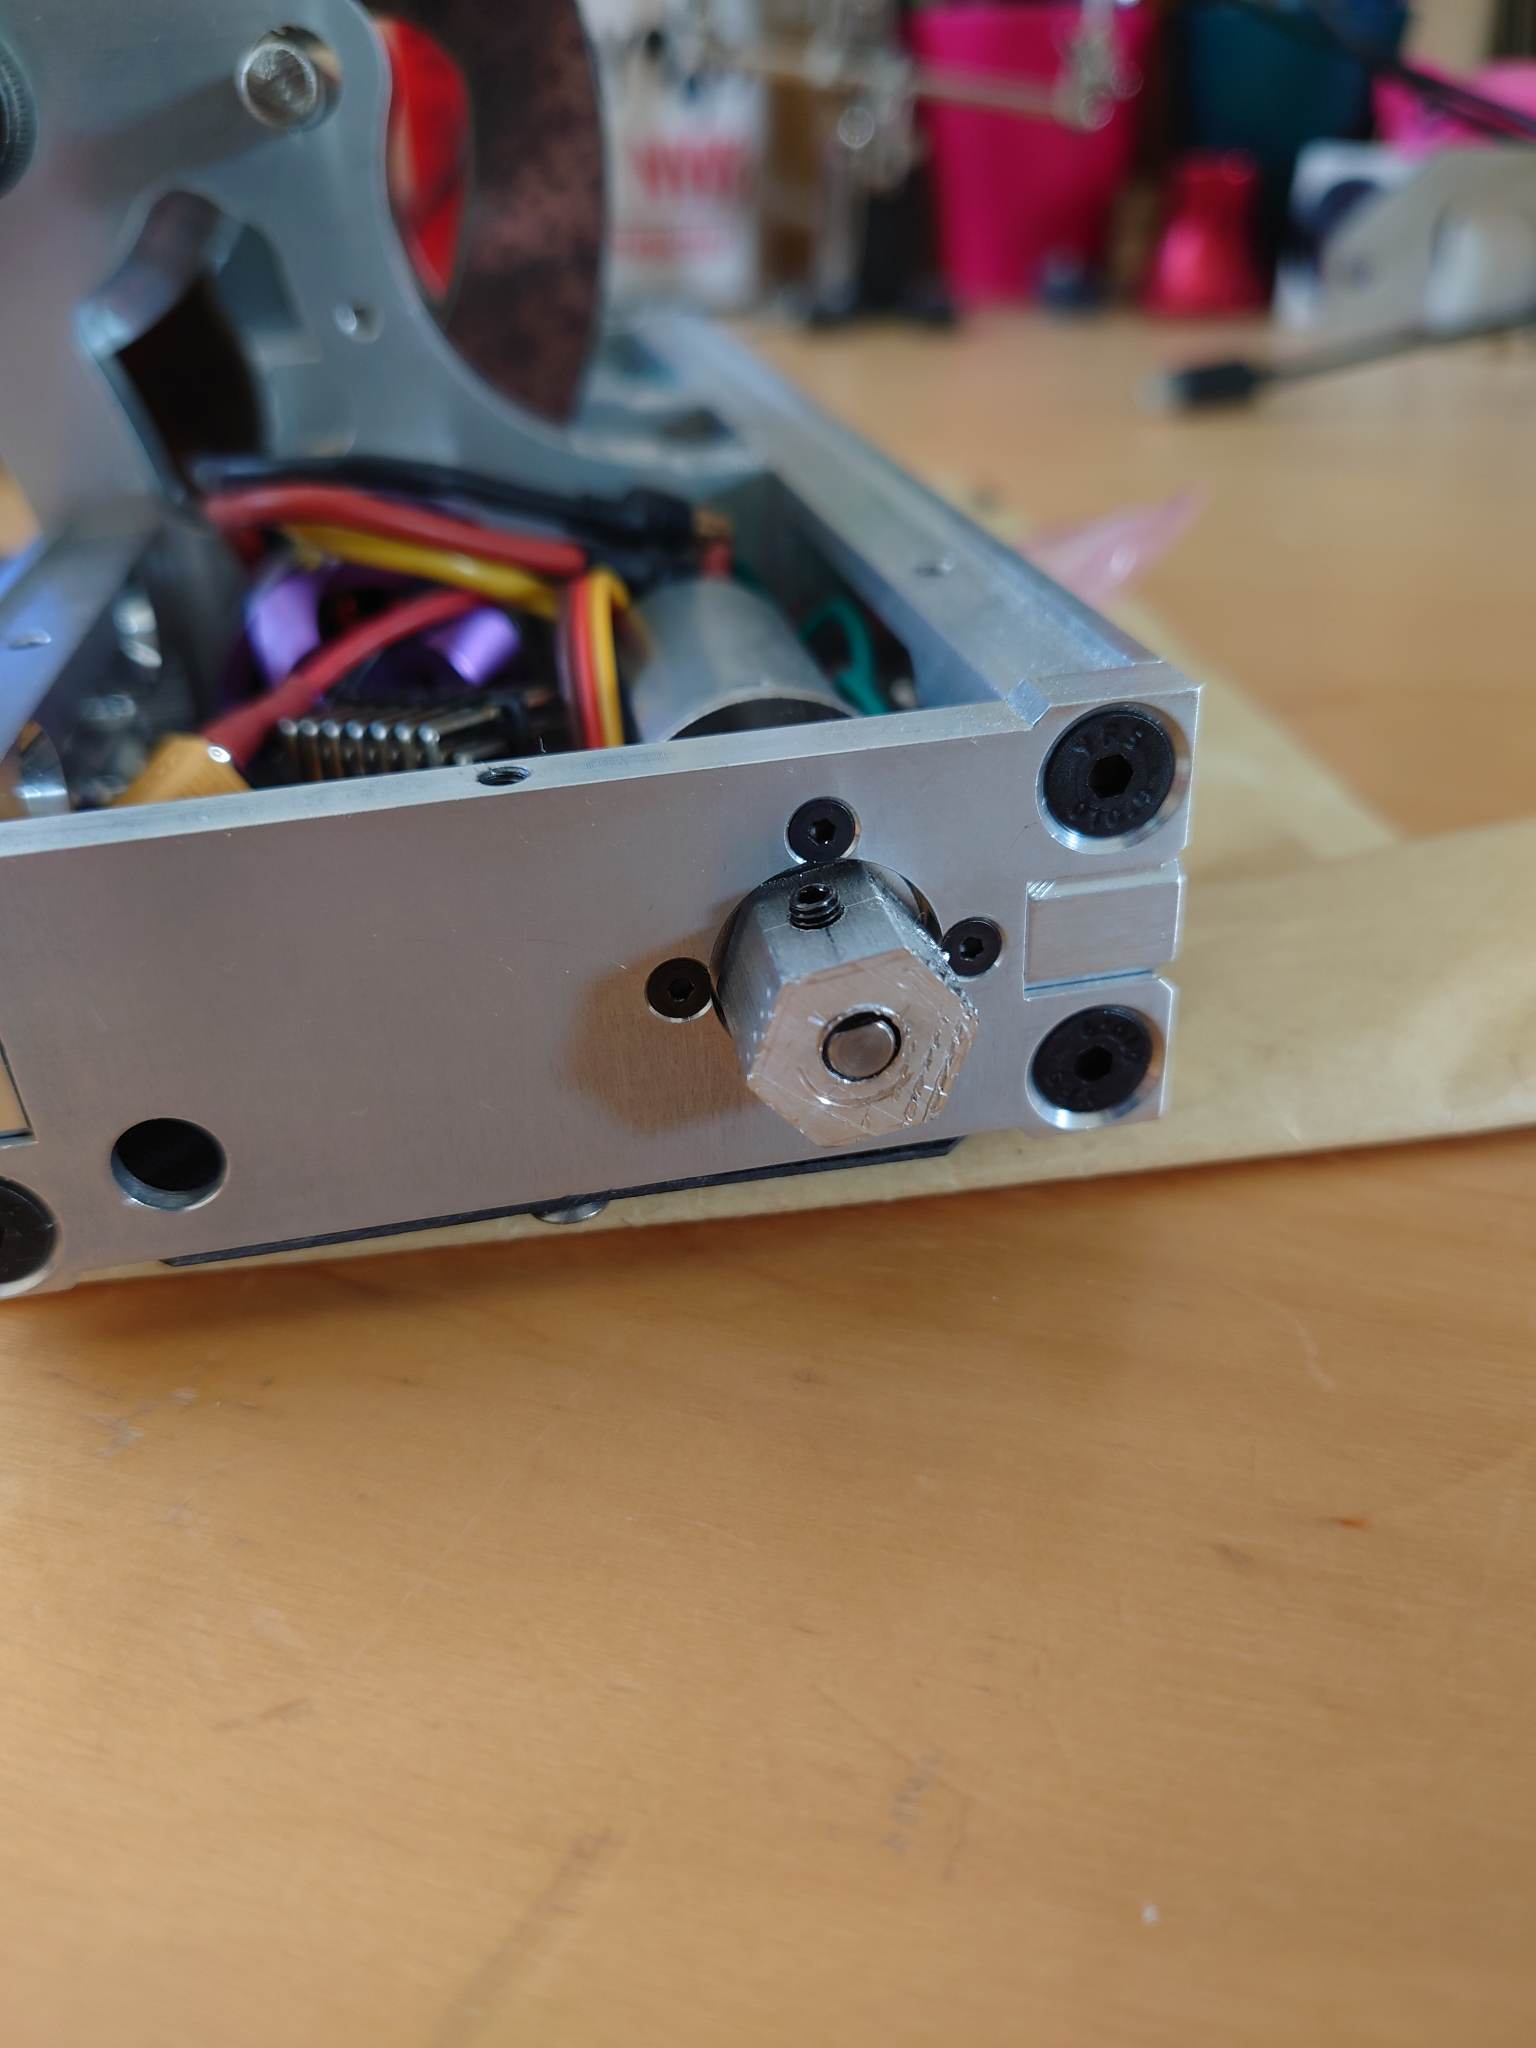
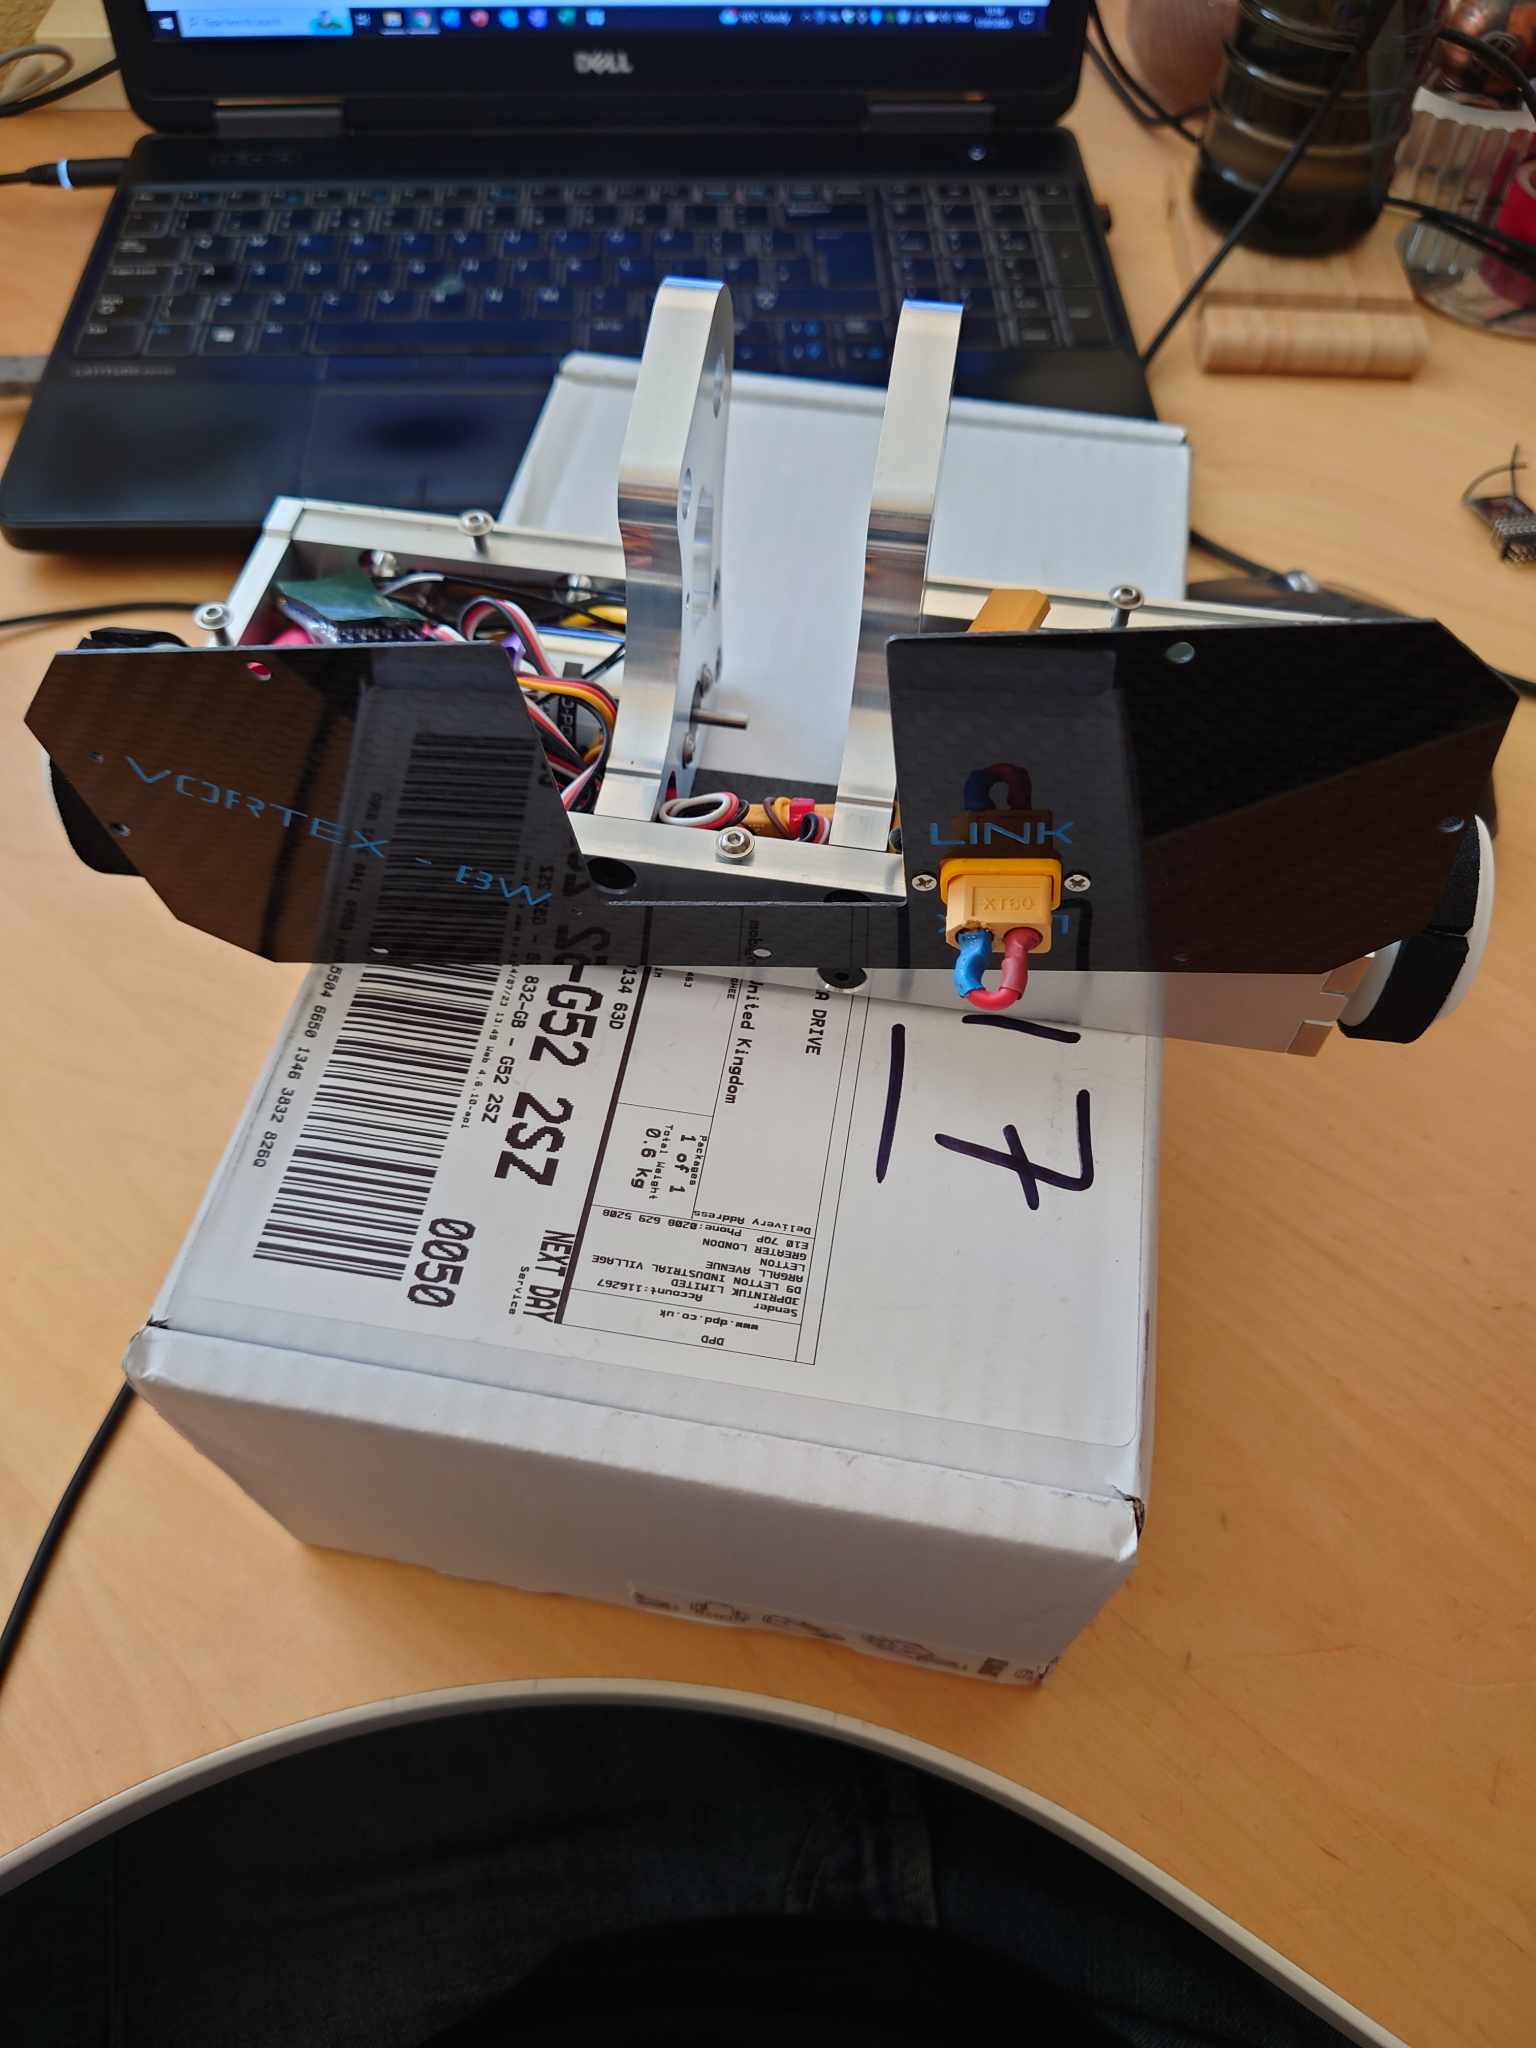
The frame then got wrapped around these. US style alu framed bots were the inspiration for the frame so it’s pocketing central here. This was very much necessary to get the chassis within weight, and there’s some deep pockets in the front and rear to add lightness. The majority of the chassis is 10mm 6082-T6, although the 2 sides are 5mm thick with no pocketing. The weapon bulkheads feature weight cut-outs rather than pockets, although the weapon motor itself is pocketed into the left bulkhead. That should help with alignment of the driven pulley to the weapon pulley.

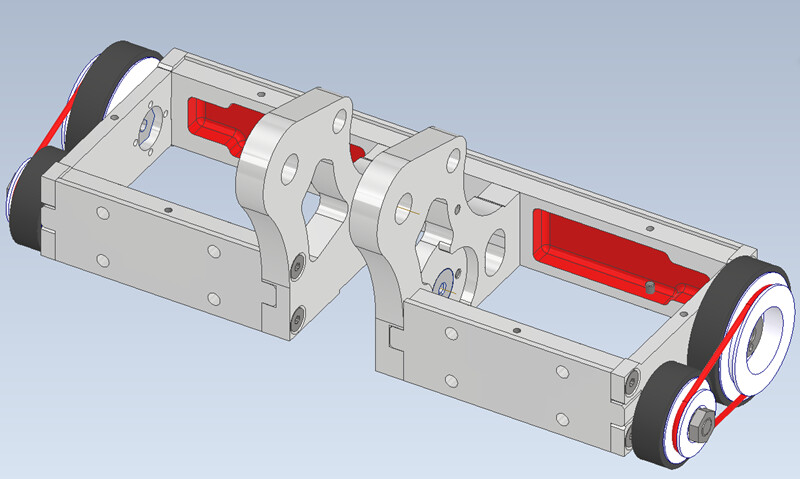
Figure 7: The aluminium frame for the machine, sans all internals. It’s deeply pocketed, hopefully it doesn’t implode when hit! Mount holes are present on the front face for future wedges/forks

Carbon was chosen for the top and bottom covers, chosen for a light weight along with looking slick. The top and bottom are pocketed into the chassis rails to try and stave off the chance of either getting obliterated in a glancing shot. The baseplate In particular might still explode if hit by a vert, but at least that’ll be entertaining. The whole frame bolts together and has finger tabs to try and take loads off the M4 fixings holding everything together. If a part is damaged beyond repair, then it can be swapped out although the hope is that a single chassis should be good for a couple of events. We’ll see how that goes in practice.


Figures 8: Pockets big enough for all your daily accessories

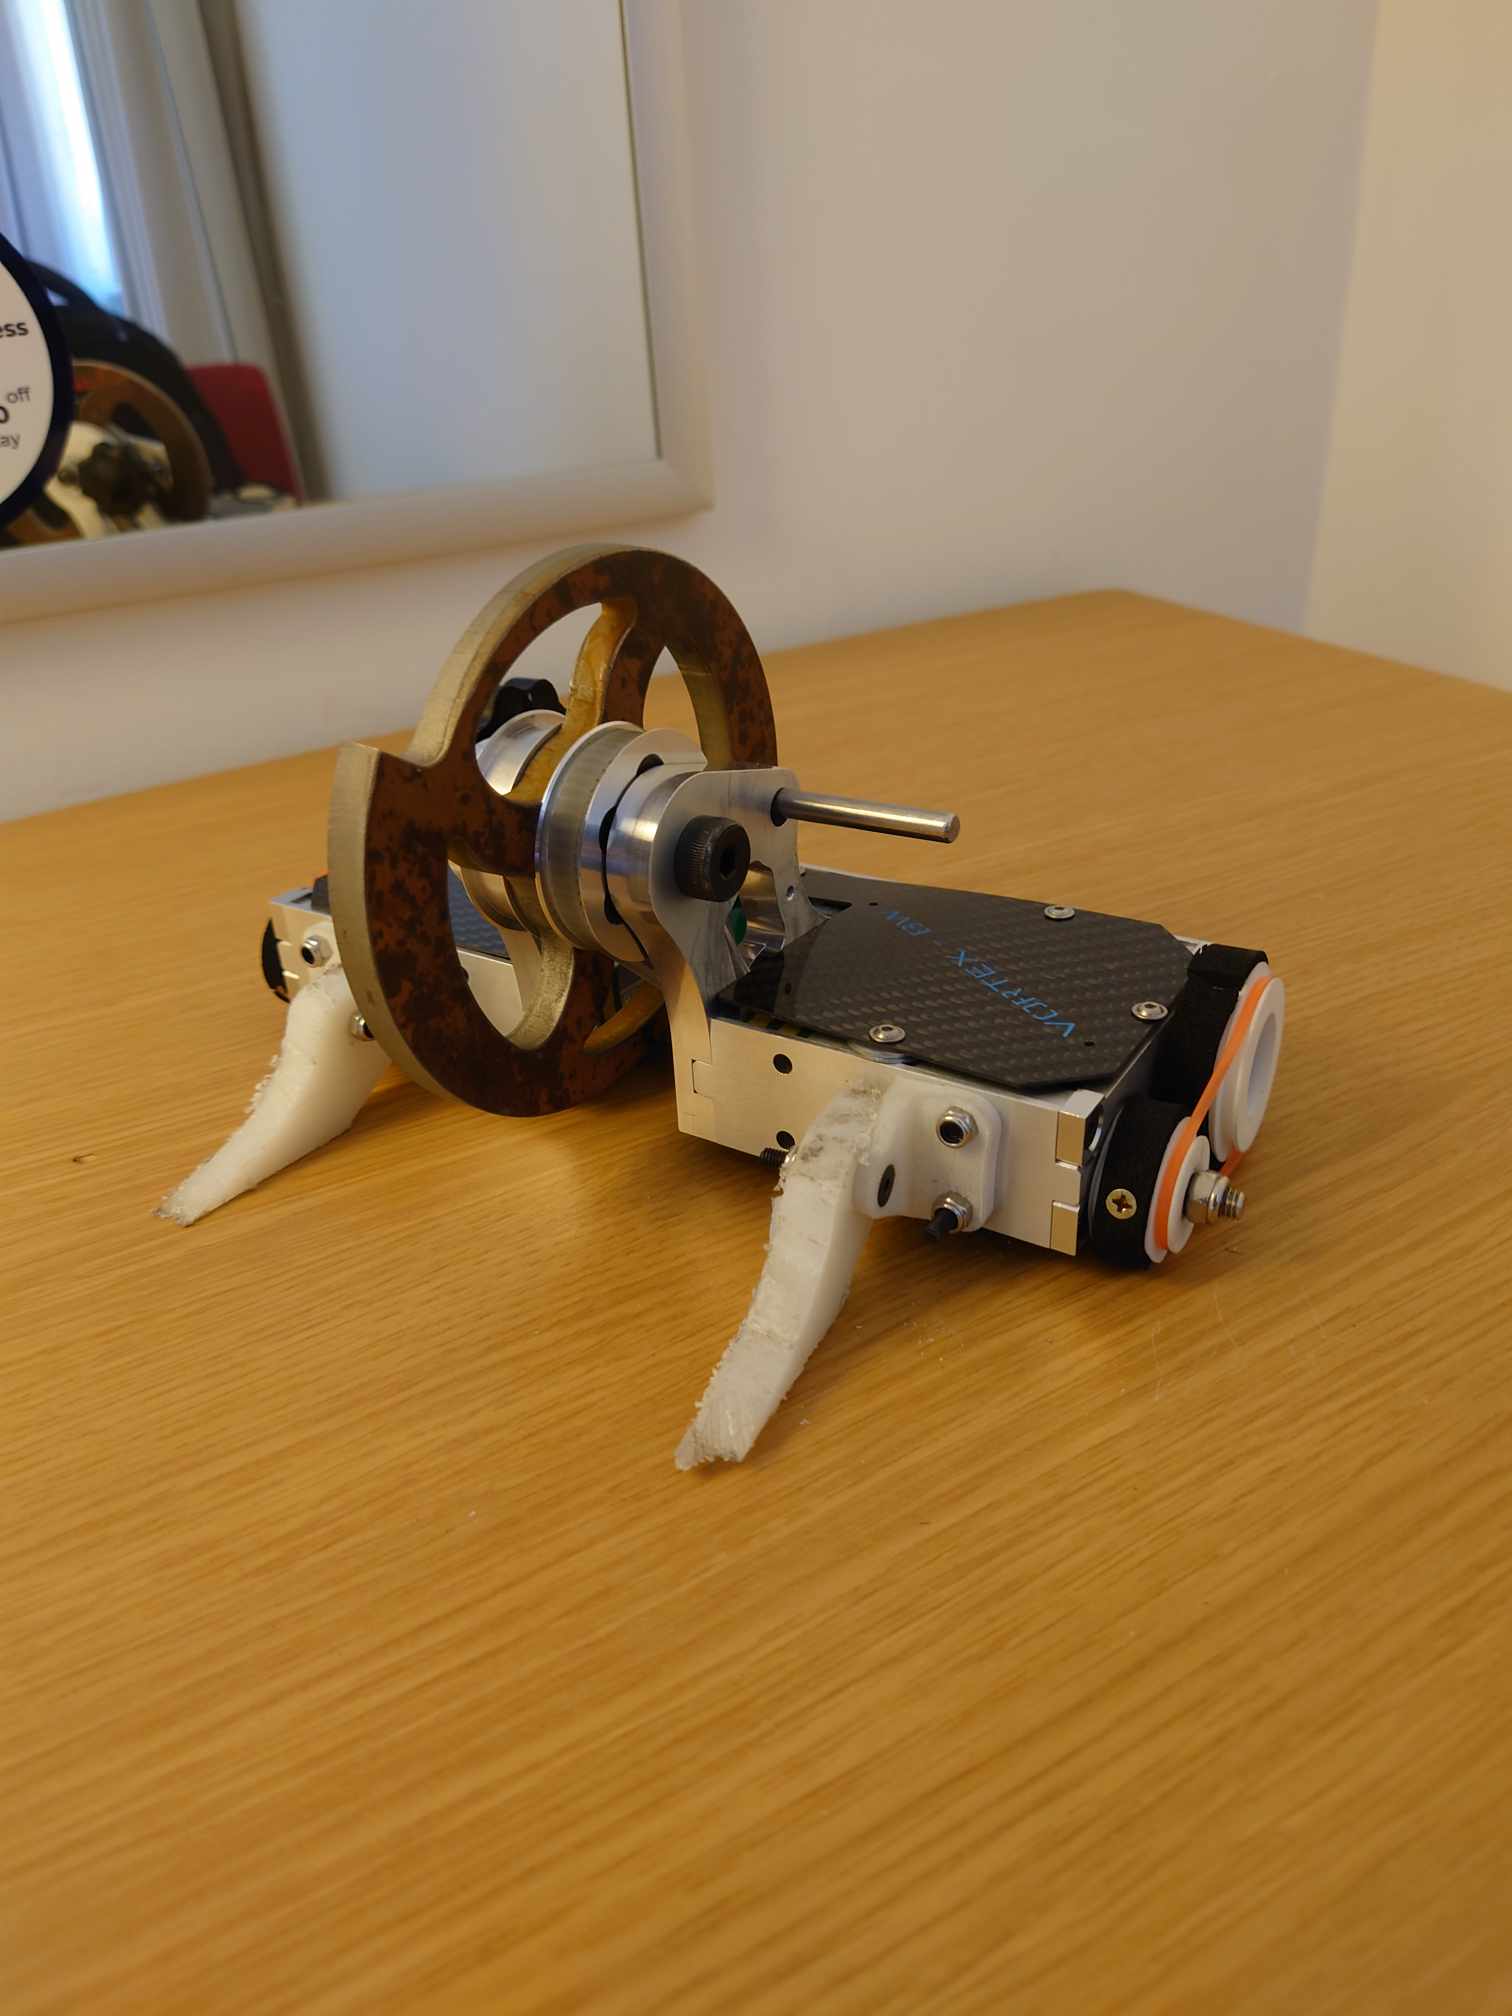
The robot will have 4WD, with the front wheels slaved off the rears using a round belt setup. Slightly smaller fronts are partly to allow clearance space with the rears and partly for looks. They run on a M6 bolt, and can be removed to make weight for front setups if a wedge or somesuch is needed. The wheels themselves will be 3D prints, with hex hubs on the rear that I’ll make up from some hex bar off eBay (again). I’m going to try EPDM strips for a “tyre” surface, we’ll see how that goes. We use it a lot at work for flooring, it wears well and is grippy. How it works as a traction surface, I’ll report back!

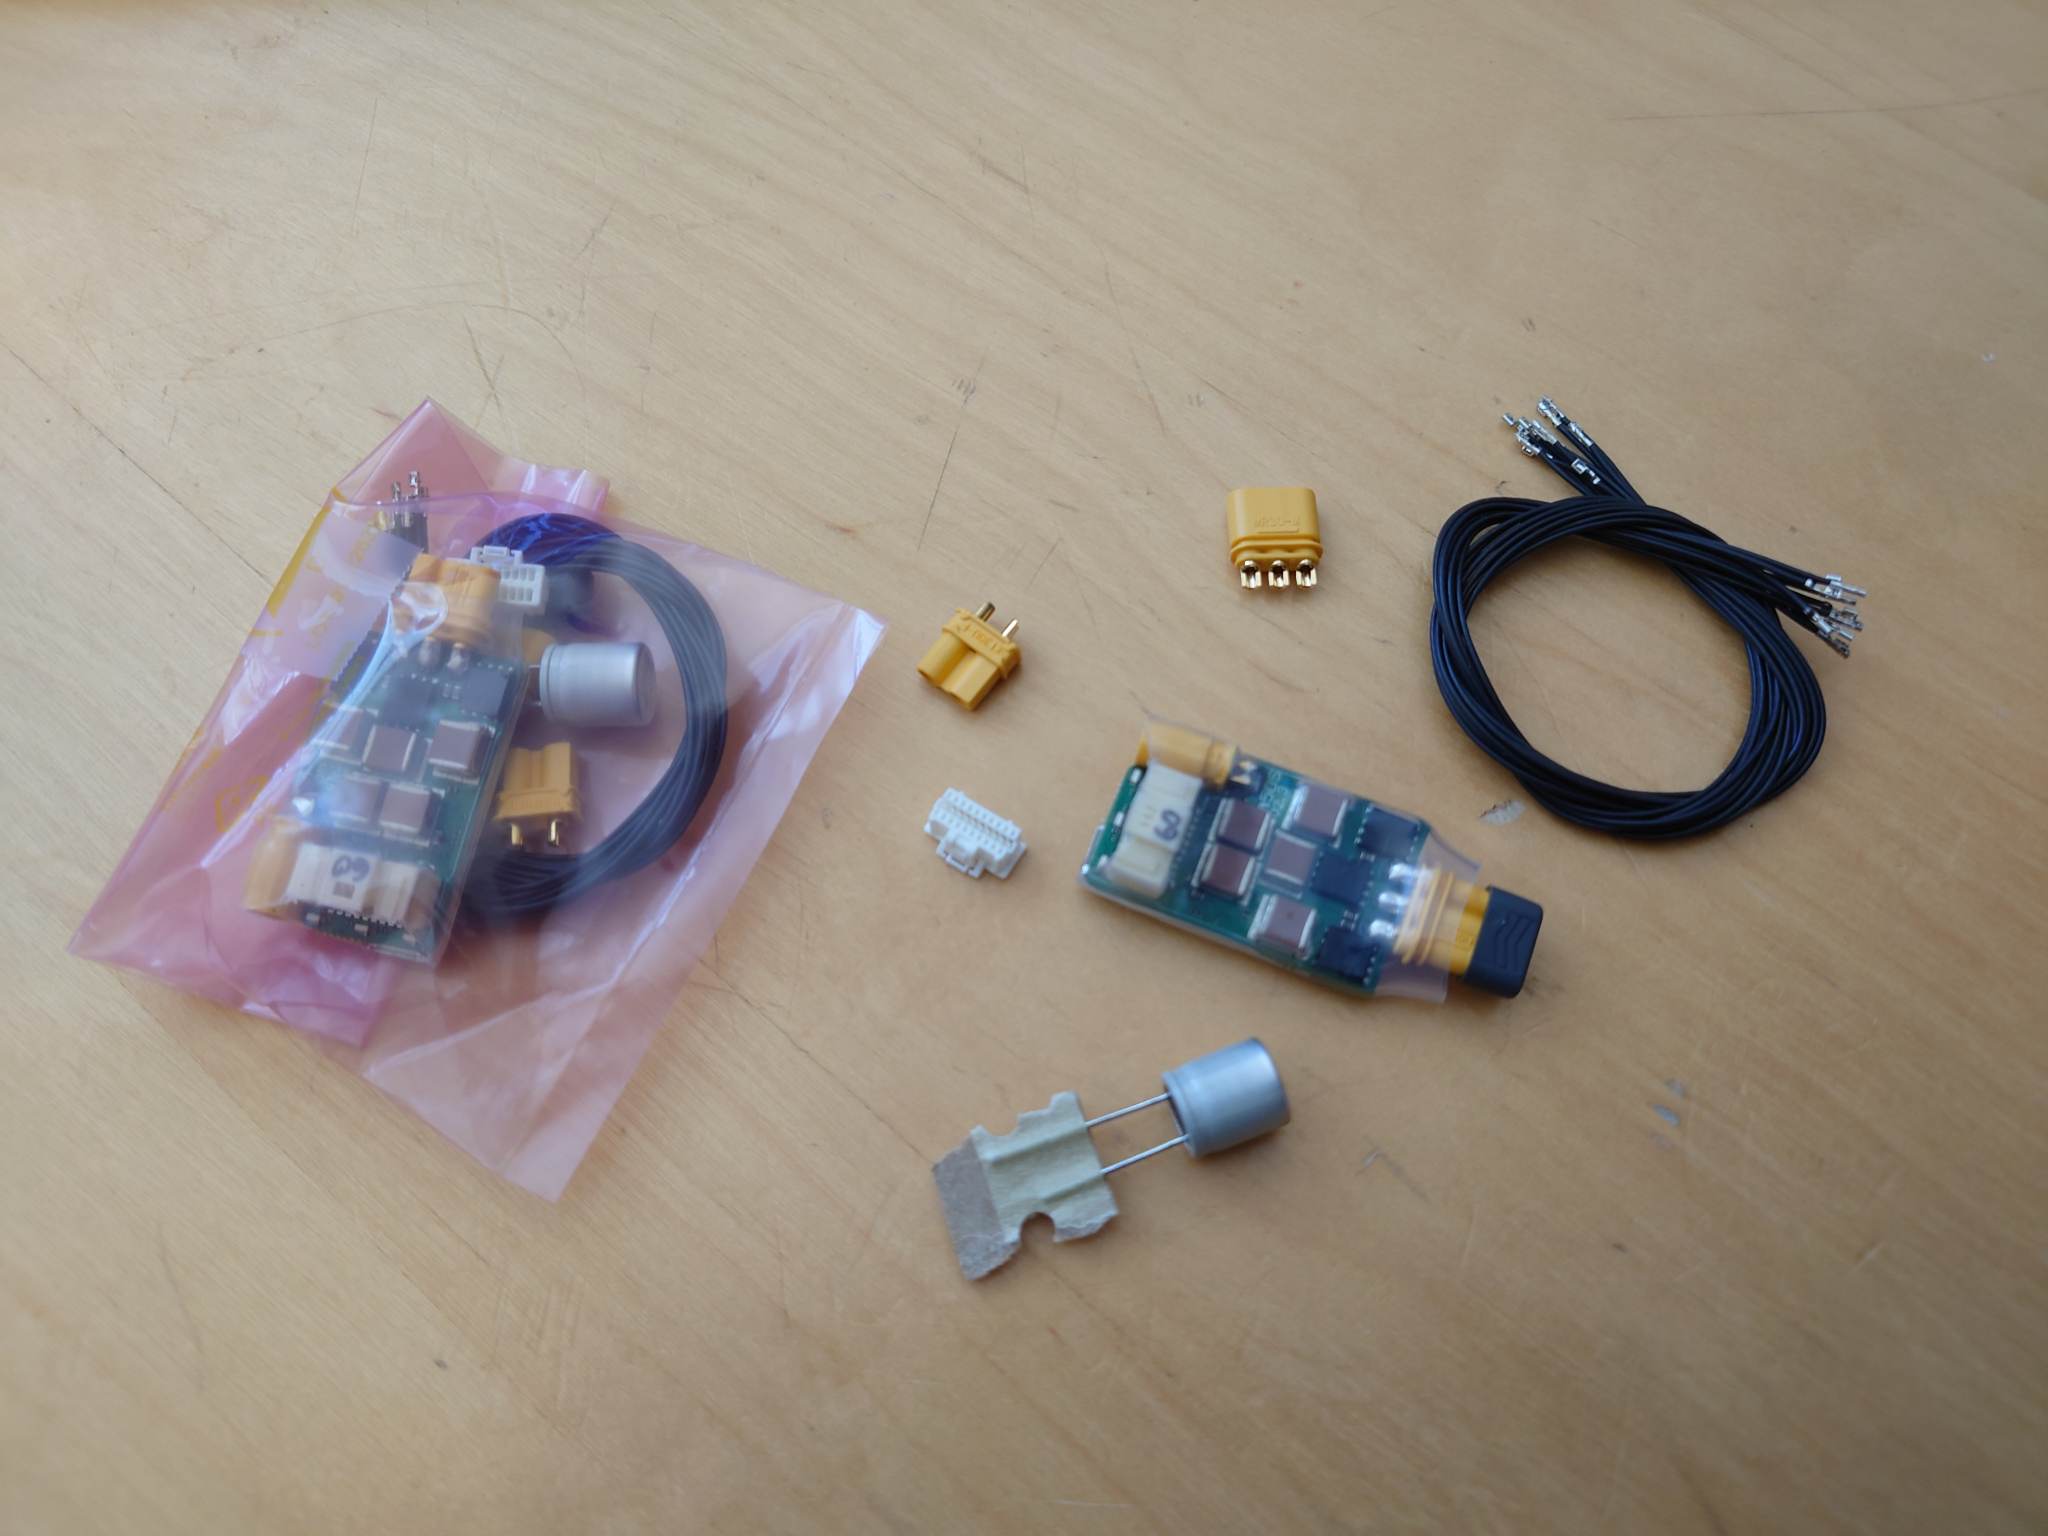
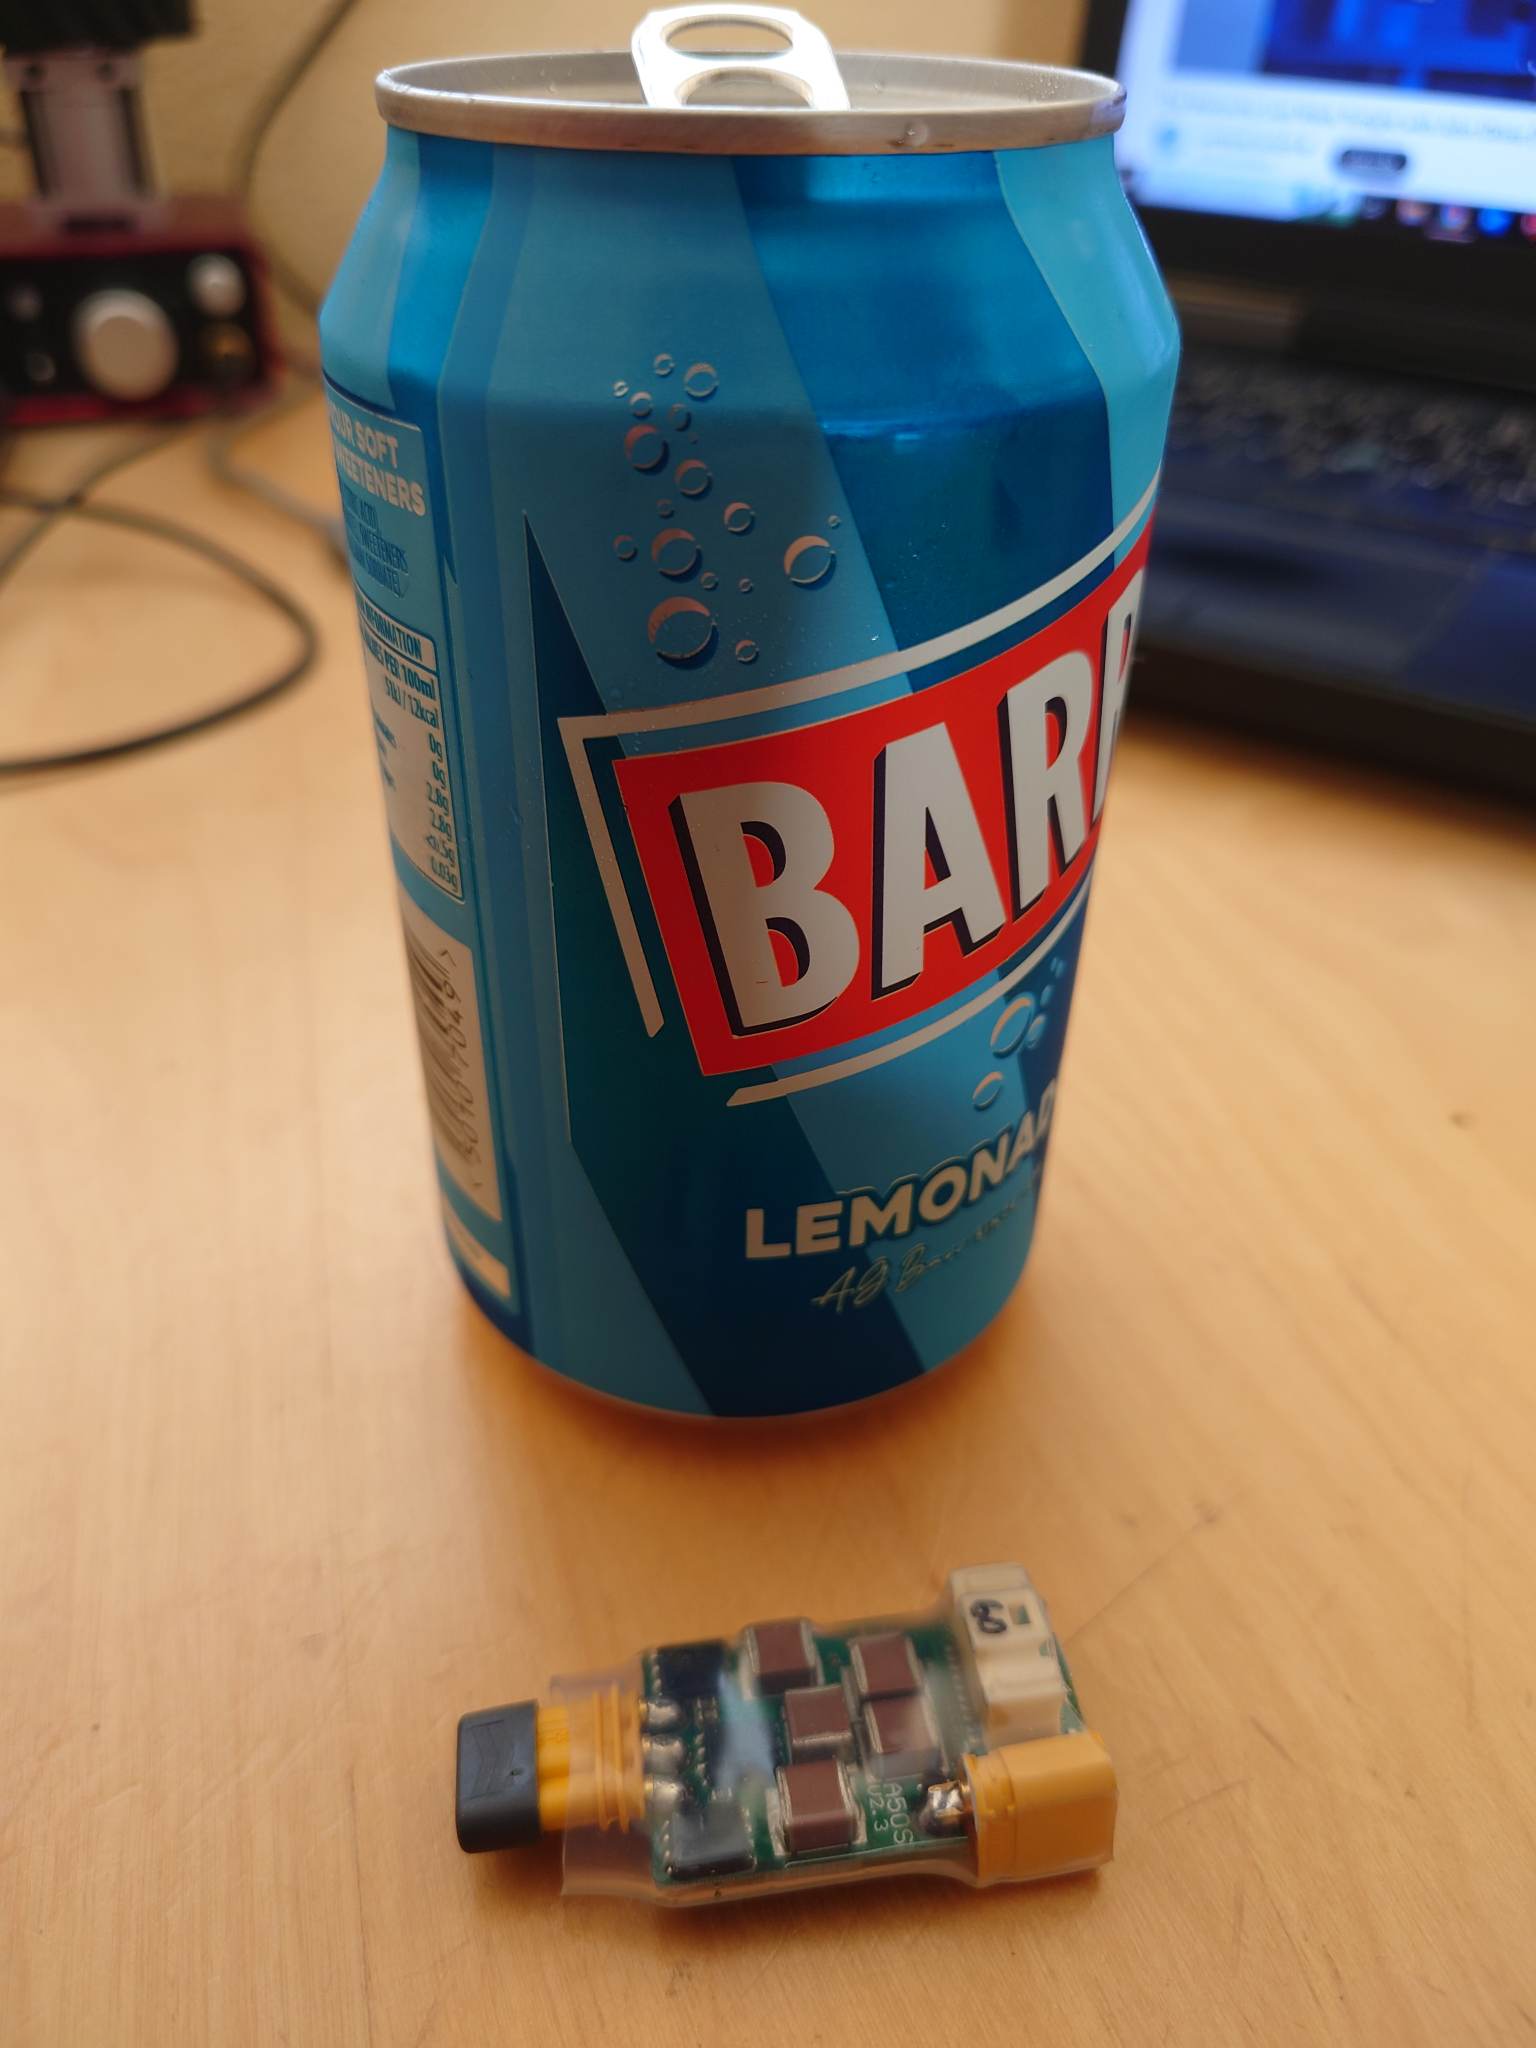
As it stands, the disc setup is all done and I’m happy with it. The frame is CNC’d, done out in China and seems very nicely machined. The top and bottom are here, the drive is in, drive ESCs are in and the weapon motor is sourced. It needs a bit of 3D printing to get the wheels etc made up, and a weapon ESC. I’m thinking one of Euan’s 50A VESCs for the weapon as I could later use that in the fabled Vega 2. Then the fork situation needs worked out, what the plan is and how I fancy doing that. It will have some sort of fork option, as well a wedge hopefully, but the specifics of those are still up in the air for now.

image

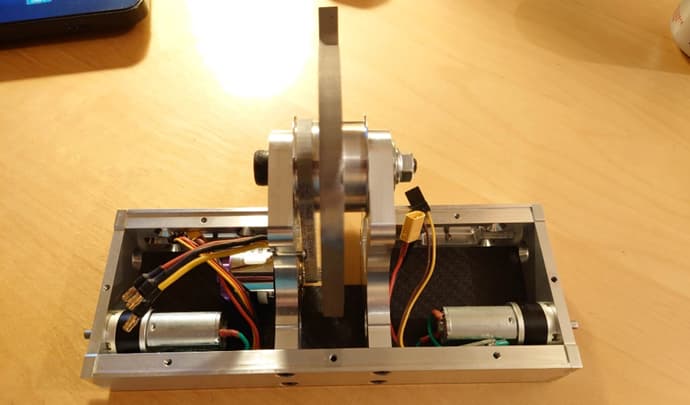
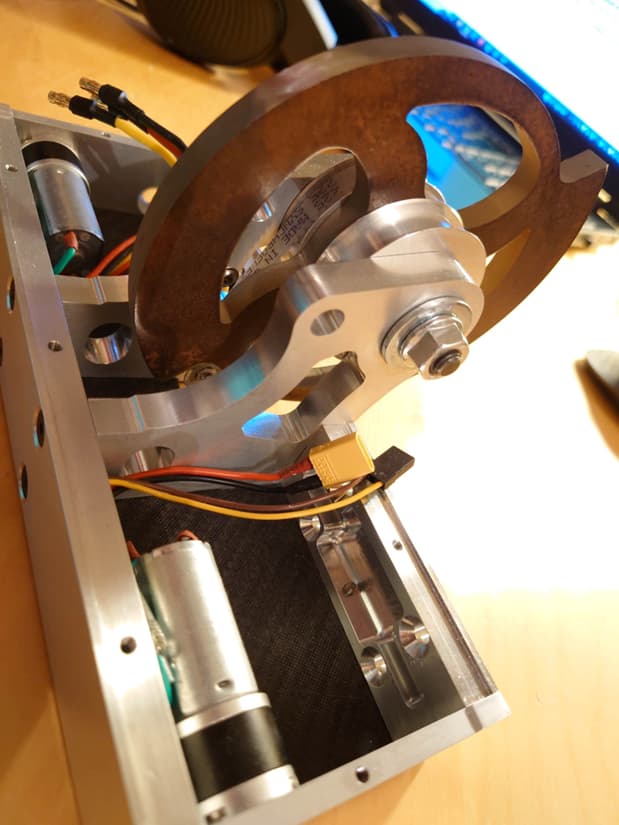
Figure 9: I’d call the frame “figure hugging” around the internals


Figures 10: Close up feat. the space for the A50S VESC and receiver

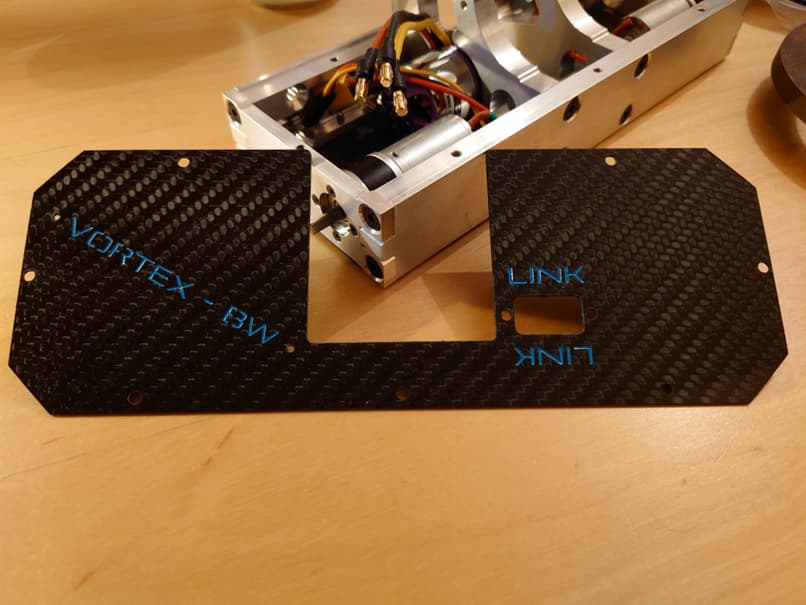
Figure 11: Carbon - looks cool; may explode

I’m hoping to get this all together over summer, and hopefully make some BBB events this year! If I’m dragging on that, I need the community to hurl abuse at me until it’s done so please remember to do this. Hopefully, I’ll be back with some running progress on this soon.

5 Likes

That is a beautiful bit of kit, lovely to see more metal armour and chassis components, hopefully will take the knocks well :slight_smile:

1 Like

Thanks man! I’m just hoping it works as intended and puts on a good show once it’s done. Hopefully brings something a little different to the scene for a while.

1 Like

Will be great to see you two back at events! Looks to be a nasty bot, you don’t see too many Ali spinners in the UK compared to the US, but it all looks super neat so far, can see it being a scary piece of work going forward!

1 Like

So shiny! Echo the others nice to see metal and you guys around, hopefully at a BBB event, or I hopefully will come see you at Burgh maybe! :slight_smile:

1 Like

It’s been a while since the last update. But some progress has happened!

Today, I received my weapon ESCs from TeamTriforce, I’ve gone for the A50S model here to run the weapon. VESC seems to be the way to squeeze the most performance out of brushless these days and if I ever get round to building the Vega 2 design then I could use these in the drive. I’ve got two units, partly for the feather potential and partly as spares.


Tiny lil ESCs, that should be able to dump plenty of power into the weapon motor


They’re absolutely dinky, ft Northern Appropriate can of juice

With these on hand now, the internals are now pretty much set and with me. The drive electrics all run, although a new wiring loom is required as the test one is a bit hacky. A finalised wiring loom can now be made which includes the weapon system.


Will need de-chaosing

The final thing this needs now is some 3D printing, which is something I’m fairly new to. I’ll be outsourcing the prints so thankfully I can avoid the chaos of setting up a printer. The plan is to print the wheels on this machine, as well as fork mounts. I’m thinking some sort of Nylon for the wheels, with EPDM strips to give traction. What are folks printing wheels from here? The hubs are hex bar so there should be a good surface area for power transmission.


Hex hubs for the wheels, I might get these re-manufactured by someone competent because I’m a hopeless fabricobbler


EDIT: Potential wheel design, added in post as I am incompetent

I’d be keen to know what others 3D print their wheels from, or if that’s potentially a terrible idea. This is now signed up for the BBB Subterranean Brawl so the clock is ticking toward it needing to run…

3 Likes

Wow! Absolute overkill on the weapon ESC. Should be bulletproof.

I think the general consensus is for TPU for anything that has a chance of getting hit. It is so flexible and pliant that it shrugs off most whacks. Failing that, nylon is an excellent option also. There are expensive filaments like Taulman 910 which are the best option but I have had relatively good luck with Esun nylon which is about a third of the price. My current ones are ABS which leans towards too brittle for combat but they have a semi structural tyre cast around them so they should hold together even if they are a consumable.

The only problem that I can see with your hub design is the lack of any way of retaining a wheel or hub axially. The ones I bought have an M4 thread that lets me bolt the wheel on.

1 Like

Cheers Harry!

Yeah, the weapon ESC probably is a bit over the top. But I’d rather churn through motors than ESCs as they’re a lot cheaper :sweat_smile:

Thanks for the feedback on the wheel material, TPU is a material that interests me generally. We use a lot of certain urethanes at work, I think a mix of CPU and TPU and the wear characteristics are pretty good. The good thing is I’m hoping to not need the print for grip, just for structure.

I’d forgot to upload a picture of the proposed wheel design, eventually I’ll add small washers which hold the wheel axially. I’m thinking of leaving that until I have a decision on possibly re-manufacturing the hubs, if I got a batch made properly I’d probably just ape the Hexbug design with a circlip. Originally I was intending to use the Hexbug hex hub, but they seem to be unobtainable here now

Looking clean! One thing I might add is possibly running your drive pulleys on the inside, in between the wheel and the chassis, so they’re not as exposed

Hello all!

There has, thankfully, been some further progress on this since June. A lovely box arrived in the post over the weekend which was full of 3D printing from 3DPrintUK. These would hopefully be the last big pieces of the Vortex BW puzzle.


All your 3D Print are belong to us

I’d had the wheels printed for me, both fronts and backs, along with some fork mounts. I’m hoping to run some forks on this but that’s at the discretion of weight. Most parts are Nylon, with the fork mounts being TPE to hopefully allow some flex. We’ll see how that goes!


The box also serves as a cradle, this might un-ironically be used as such

That now meant all the parts were available for a trial run of the robot, with the focus being on drive with the proof of movement deadline looming for the Subterranean Brawl. The drive electronics have been largely set for a while now, but the wheels weren’t here so it couldn’t do the drive.

With everything in it’s a cosy lil machine. I’ll need to wrap the weapon motor in tape to prevent the vents on the can ingesting other internals and the disc passes alarming close to the wire bundle running from left to right. I’ll be putting a little barrier in there to stop any self-ingestion but it really hammered home how small the frame is.


S Q U E E Z E

With all that said though, it drives okay! It’s in 2WD mode here, I haven’t yet bought the bolts which act as axles for the front 2 wheels. 2WD will be a possible config for it though, if weight becomes an issue, so it’s good to see that it will shunt around in that style.

Vortex BW - Finally, It Moves!

In that run, it’s on the 3S backup battery which is one I’ve had kicking around for yonks. There’s a 4S Overlander in the post which will be the preferred battery, although snug in the frame. Other tasks still to complete are below;

  • Get appropriate bolts to attach fork mounts and trial these
  • Make some forks
  • Look again at the wheel hubs, they’re defo wonky. Possibly get someone competent to do another set
  • Some VESC programming
  • Fit the new weapon drive pulley as the one I bored is, as always, a bit wonky.
  • Trial weapon
  • Possibly, once all is together and working, make another loom that’s a bit tidier and see if there’s anywhere it can be further shortened.
  • Add the power LED which I have once again forgotten to wire into the robot.

Hopefully now progress will come thick and fast, I’ve got a busy couple of weeks in general so it’s going to be tight for time but all looks to be well on track. Hopefully, there’ll soon be an update here with a finalised running model!

3 Likes

Ticked off your PoM!
Definitely looks cosy in there, smaller receiver required maybe?
Keep up the good progress :slight_smile:

1 Like

I’m getting there Joe, I’m getting there!

I’d be keen to find out if there’s a smaller r/x available that works with DSMX, I’m really out the loop on the radio side of things! I’ve still got the DX6e that I’d like to keep on working with if at all, might be saddled with the Lemon Rx

This could be of use to you :slight_smile:

2 Likes

I was going to say redcon CM421s are comparable to flysky 4 channel ones but they’re very hard to get now, DSM2/X stuff slowly in decline

1 Like

Seems like it’s worth ripping the pins off the Rx and hardwiring the lot. I have done this on every beetle so far and it hasn’t bitten me yet (famous last words). Shrink space and simplifies everything.

2 Likes

Firstly, thank you very much for the above suggestions of DSMX receivers, this is very much appreciated! For now, it’s all running off the Lemon but if the time allows I’ll move to something smaller.

It’s been a wildly busy 2 weeks, but there has been good progress on the machine. Finalised parts to tidy everything up have arrived, tomorrow is a day to make a new wiring loom as I’m not happy with the standard of the current one but it all does work and will be a backup should that be needed.

My last experience with VESC was watching George descend into slow, omnipotent madness in 2018/2019 getting a pair of Hobbyking 4.12s to move a heavyweight around; but I had been watching folks say the new tools have been getting much better. Holy cow, I was not prepared for what VESC now is. In about 20 minutes even I (an imbecile) got the weapon motor running reliably by following some menus and basic prompts. The future really is now, and this old man is impressed.

The very good news then is that all systems now work on Vortex BW, and look to work well. Failsafes are all set, power LEDs are artfully installed etc etc. So it’s now a neatening problem, then check the final weight and hopefully no surprises pop up…

Hoping to have an update tomorrow or Tuesday with some shiny photos

1 Like

Glad to hear things are going to plan!

On receivers, it’s worth noting that you can get the 6 channel lemon Rx ones with no pins, which saves the trouble of having to wrench them off. I sadly killed a receiver by trying that though you may be less cack handed than I!

Hello everyone,

Apologies for the late post here, the bot is now all working it seems! I have managed to squeeze in the 4S battery, although if it’s giving me trouble between now and the event then it might get yeeted for the 3S backup.

There’s niggles to the machine, and I’m really hoping my cheap scales aren’t snaking me with the weight, but everything is working so I’'m pretty pleased and ready for Sunday it seems. There’ll be next to no spares there with the robot, so hopefully it doesn’t self destruct…


1468, sweet, sweet numbers

This is genuinely the first time I’ve ever had a working robot before an event, none of the heavies were ever done before event weekend and neither was Vega. Even if this puts on a hateful performance, I’m proud of getting to that milestone for once.

There’s a little weight for some forks, and in a quick kitchen floor test drive the robot showed an alarming tendency to do forward rolls whenever it changed direction so they look like they’ll be needed. I’ll probably just use HDPE for those, light and will take a beating rather than bending or shearing off.

See you all Sunday folks!

5 Likes

Good evening everyone,

Coming out the other side of Subterranean Brawl, it was a crazy event and I didn’t really appreciate how much I’d missed the whole bot community and doing comps. Great job to the BBB crew! I even sent a couple of mates the longform video of the event and they’re now keen to attend :eyes:


Hotel photo, looking all clean before the event

Lets start at the beginning - my fears of scale snaking were well founded and the robot initially weighed in at 1508g. Part of this is my rubbish scales, part of this is due to a dodgy shipment of bolts from eBay where rather than 10 x M4x20 bolts I got 20 x M4x10 bolts. Therefore I had to patch the forks on with bolts I had kicking about that were waaaay too long. I had to lose 8g, so I removed some washers in the bot and the top mount bolt from each fork mount. Keep that one in mind…

When we went for tech checks, the drive was flawless. But once the bot was put into the spinner test box, it decided to get stagefright and would not spin. Cue some frantic tinkering, it turned out that by tightening the top panel right down it was pressing the motors wires on its own can and binding everything up. A washer between the top and the frame gave a little breathing space and then she ran well. We were ready to go!


Place gratuitous at event shot here

Our first fight was a chaotic 3-way (is there any other kind?) with Toucan and EVA001. As we were getting loaded into the box, we were asked to give it some welly as the previous fights had been quite tactical. Toucan took this literally and performed possibly the best suplex I’ve ever seen in robot combat on me. If you haven’t seen it yet, give it a watch as it’s a beautifully performed move.

(https://youtu.be/4iaw830viA8?si=kP0Vrv38DybWsTB3&t=453)

Turns out the floor in Dave’s box is pretty solid, and in the ensuing pinball our forks rode up and out the way of the ground. This was a problem; as I’d mentioned before the robot has terrible weight distribution and basically is undrivable without them. Cue me then struggling to get any traction on the floor. Toucan then got a 2nd suplex in on me and when that happened the weapon mysteriously died. We drove around for another 30/40s before getting toppled onto our back where, with no disc, we were stuck.

The weapon death proved to not be random gremlins or a hex curse from the past appearing, it turns out that in the 2nd suplex something in the weapon assembly shifted and the disc hit the weapon motor. The weapon motor did not like this at all. I reckon that the culprit here was some nylon “heat resistant” thrust washers that had melted, allowing slop in the setup.


PAIN

The weapon motor was now cheesed, and we didn’t have any spares with us so that was that for the big disc.

Thankfully the drive seemed solid so we removed the disc and threw the bot back in for its next fight against Sad Boi. A little wedge brick, Sad Boi was going to bully us around but at least we’d be in the arena for a fight! Once again, the front forks got bent on the machine and we struggled to engage properly with Sad Boi; he bullied me around and then I ended up down the pit.


The art of the bodge, well on show here. Picture ft my beer gut

At this point, I had a small breather to gather my thoughts as it had been quite frantic between fight 1 and 2. Loading out of fight 2, I noticed that the fork mounts had twisted sideways due to only having 1 mount bolt per side and it hit me like a ton of bricks. Put the top mount bolts back in because the robot is now 600g lighter than it was for weight in. So I did, and the forks were now pretty solid. I also noticed at this point that the wiring into the removable link had got hot and started to de-solder itself so I patched that up. The drive wiring was never designed to withstand shoving matches, it was for delivering the weapon to stuff and no more, so it had never been specced for 2 minutes of stalled drive motors.

(https://youtu.be/4iaw830viA8?si=ByZXovyeQodimpbu&t=2350)

Fight 3 vs Grab-Bee

Fight 3 was against Grab-bee, a hugger that looked really cool and had the support of most of the audience. This time Vortex really drove rather well, it was planted and it controlled pretty well. We seemed to have a good amount of traction and the more solid fork mounts were working really well. However, after about 90s something gave up inside the machine, first the left side died, then the right, then the left came slowly back to life but then the whole thing went. We had power to the LEDs, and on closer inspection the wiring loom looks alright so it might be due to a wiring gremlin or it might be a motor(s) burning out/dying after a long day. I will fully strip the machine down and report back!

So what have we learned? Well; the aim for the weekend was simply to get to an event, get through tech and get into the arena and the bot did that so I’m happy. When the bot was working, it was really working and people seemed to really enjoy that first fight so I’m very pleased with that. I’d break the pros and cons down as below

Pros:
Drive worked well when the forks were down
The weapon rips
The EPDM foam strips seem to make decent tyres
It looks sick and people seemed to really like it, which is the main intention
It falls thoroughly into glass cannon territory, again the design aim
It looks like the idea behind having a deliberately lower tip speed to focus on engagement is probably pretty good

Cons:
If the forks go, it’s undrivable. So the fork setup needs more thought. The root cause is weight balance, but we’ll get back to that later
The weapon took out its drive, need to make sure that can’t happen again
It’s a mess inside, so servicing can be a pain. Particularly fixing the wiring loom
There was no spares, that needs fixed for future

I think then that this leaves me with 2 plans, a short term one and a long term one

Short Term - Keep this chassis, maybe with some tweaks, and get it running reliably and hitting hard. A version of this frame will be at Burgh when/if that goes ahead! That means living with compromises like weight distribution and the tiny wheelbase, but there’s potential in this first draft that I feel I should realise before moving on.

Long Term - This is basically a plan for 2024. The idea has merit, and you can do an all-alu BW that’s competitive. I’d like to try and push that idea to something that has a fair chance of running deep in an event. That probably means a ground up redesign to solve the core issue with V1, the weight balance and centre of gravity. Fixing that will give it a much better drive. Then, if the weapon reliability can be dialed in on V1 this year we transpose that whole setup to V2. I have been looking at Ellis’ build diary for Gizmo though and the idea of custom drive is growing on me…

So that’s a wrap for phase 1 of Vortex BW. I built a machine, it did a comp, I’m happy with the idea and now we move onto phase 2: refinement. By Phase 5 or 6 we’re looking at WORLD DOMINATION, but that’s a while away yet.

Thanks for sticking around everyone, hope you enjoyed the ride so far, and I’ll hopefully have more updates soon :heart:

4 Likes

A quick addendum having now stripped everything, a couple of findings that folks might be interested to know.

On stripping the bot, I did find one slightly wobbly receiver connection. That probably explains why in the last fight I hit a wall then the 2nd drive side gets a bit patchy, I think I’ll be heading to soldered r/x connectors in future.


The insides of a BBB gearbox if you haven’t ventured into here

I also tested both drive motors, one is fine and that was the loose r/x side. The other drive motor is sadly dead, so that takes the sum total of damage from SB to one weapon motor, one weapon drive pulley, one weapon drive belt and one drive motor. Not a terrible haul!


The gearbox will be a useful spare!

Just need to think of what to design for next years SB now…


Foreshadowing? We’ll see…

3 Likes